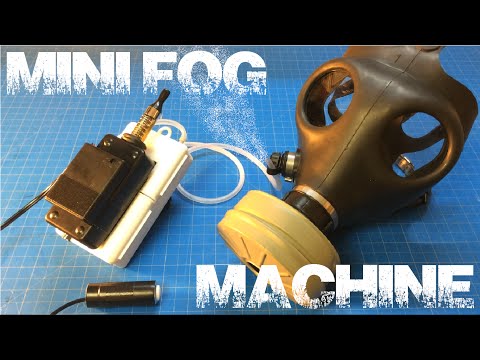
hey everyone this is my e-cigarette mini
fog machine I think it would be perfect
for Halloween to add your costume for a
smokey effect and also if you want to
add it to a jack-o’-lantern and have a
portable option instead of using dry ice
or heating up a vat of the fog fluid or
lugging around this giant fog machine
that’s the size of like a shoebox when
you’re trick-or-treating but then you’d
have to find like an alternate power
source so this option is completely
portable it runs off of batteries and
it’s really easy to build at least from
my perspective you will need some
soldering skills and depending on how
intricate you want the build to be you
may need some computer programming I use
an Arduino micro to regulate the amount
of smoke that’s coming out so it doesn’t
burn the coils inside of the e-cigarette
but there’s also this option of making a
little switch it looks like you have a
bomb strapped to your chest so I might
second-guess walking around with this
whole setup but it’s Halloween people
are walking around with plastic knives
and masks and blood all over them anyway
so I’ll take my chances so anyway I’ll
show you guys how it works you turn that
on that’ll start heating up your coils
and then there is your smoke it’s coming
out at a pretty quick rate and a little
heat up a little bit and there you go
and if you want to add that effect to
your mask you can add some heat shrink
tubing to this here and then it starts
shooting out and then I just have this
sort of lightly placed here but you guys
get the picture
that look pretty sick walking to a party
having that smoke shooting out of your
mask and if you don’t want to have it
all in constantly guy said there’s this
button here and that’ll continue you can
see when you turn it off you’ll stop so
that we conserve your battery life you
won’t burn out your coils and everyone’s
happy
so I’ll show you guys a brief tutorial
on how I built it here are the
components for the mini smoke machine
you will need the bubble box portable
air pump that also comes with the Stu
being shown here you’ll need some
various sizes of heat shrink tubing to
connect your wires you want to look
specifically for an e-cigarette
that has the variable voltage here on
the bottom there’s a little knob and
then also one that has a different type
of top see how that comes apart into two
different pieces some of them the button
is actually part of the cylinder here
you don’t want that because the only way
to really take this is take this out is
by wiggling with pliers and you don’t
want to damage this recharging port here
so look for one that has this little
plastic portion at the top and it’ll be
much easier to take apart and then
you’ll also want a cartomizer that looks
like this you want it to have this dot
in the middle sort of like a cylinder
see if I get this to focus there we go
so you can see how it’s just a cylinder
there’s nothing around it blocking the
surface this one would not work you can
see because it has a little ring going
outside of that and that will block you
from allowing this to work I’ll show you
guys a little bit more in depth more
detail what I’m talking about
you’ll also need some speaker wire and a
six volt 4 triple-a battery supply
that will power your Arduino your
Arduino is not necessary I’m using the
Arduino micro and you’ll also want a
reed relay it’s a 5 volt DC Reed relay
but like I said you don’t need to have
this computerized it just makes it run a
lot smoother so that it won’t overheat
but if you have this little switch here
it’ll work just as nicely basically this
is a doorbell switch that I ran in
series 2 this speaker wire here and
that’s how you would turn on the coils
and the bubble box air pump will just
run continuously unless you wanted to
add another switch and have it all run
from this but I think it works fine when
you leave it on so I’ll show you guys a
little more in-depth how to put it
together first you want to start by
modifying your project box use a drill
to make holes and back for your charging
port your wires and tubing and then for
your cartomizer you can also use some
grommets to anchor that in place
depending on how nicely you make that
hole for this cartomizer here then you
want to modify your East cigarette by
taking it apart so first I have this
variable voltage one you want to rip off
this thing here that will allow you to
pull the battery out once you wiggle
this free that’s going to come apart
it’s going to be very delicate so be
careful you’re going to pull out all of
the battery and everything so that it’s
sitting on the table and then you’re
going to want to connect a positive wire
to the battery and a negative wire to
the battery and that will look something
like this you want to put one wire here
one wire here obviously soldering you
can try and tape it and hold it in place
but it’s probably not going to work next
you want to pair the tubing that you’re
going to use for the enclosure so you
want to take some wire you want to strip
it really long so that you can poke it
through using a knife to make a little
hole then poke the wire through and then
you want to attach
so we’re how the tubing is set like that
you’re going to attach the tubing to the
inside of that little cylinder there so
you take your wire and you want to have
it touching the center then you want to
force the tubing over top and it’s a
little bit difficult to do I don’t know
if I’ll be able to do it right away on
camera but you see you get the picture
so alright so there we go so now you can
see the tubing is over top of that
little cylinder the wire is touching the
center and adding voltage to the
cartomizer and then what you want to do
is use a grommet to keep this ground
wire attached or touching the edge so I
just force that in there it’s going to
take some practice and some couple tries
to get it but it’s going to look
something like this then you can test it
to your battery and see if it’s working
if that’s working you’re in good shape
so this is what it’s going to kind of
look like once you take it out you’re
gonna want to touch wire here and here
it’s pretty simple now if you don’t want
to use the Arduino which I understand
it’s as simple you take one wire you add
it to this portion here you have your
positive going to red so that would be
the black one okay and then you’re going
to have one wire going to your switch
and then another wire going to your
ground
you press the button everything will
flow around in the circuit and it will
work then you just connect your tubing
from the box to your pump and turn on
the switch if you’re looking for more of
a challenge you can try and integrate
the Arduino first you want to power your
Arduino with
six volts or nine volts depending on
what you want to use 9-volt batteries
will work as well take your red wire and
connect it to the first pin on your
Arduino the way it’s shown in this
diagram here then you want to take your
black wire your ground attached to the
ground there’s little markings on the
Arduino so you can see pretty sure it’s
the second one from the left right here
that should turn on your Arduino and you
can upload your code I’ll leave that in
the description next you want to power
your cartomizer and integrate the relay
your positive is going to go to the
first pin on the relay this is what it
looks like the schematic so your first
pin would be right here and this would
be your second and then these two or
what are powered by your Arduino now
this sort of works like a gate five
volts is a key to open up the gate so as
soon as the Arduino sends five volts to
these two terminals here just one here
it’s going to allow flow of electricity
to go through and go to your cartomizer
so this one’s going to be your positive
this one’s going to be your negative and
negative being your ground so five volts
is going to go to the first pin your
second one is going to go to the ground
so both the six volt battery that’s
powering the Arduino and the Arduino
output voltage ground are going back to
the same pin so you’re going to have to
connect two wires connected into Y then
you’re going to take your ecig battery
and it’s just going to go all the way to
the cartomizer it’s going to be this
portion right here so this is going to
be your positive this is going to
connect here and then this power is
going to come down the Arduino is going
to give this enough power to unlock the
gate and allow power to flow to this
portion which is going to go back up and
power your cartomizer right here so hope
that makes sense and if you have any
questions you can contact me on my
facebook
Griet gadget guru channel Facebook page
and leave a link in the description for
those as well as some parts that you
might need for this project here you can
see I added the tubing to the Jack
O’Lantern and it gives it a nice smoky
eerie effect also the the pump with the
air flow coming in makes the candle
flicker gives it kind of a cool glow let
me know what you guys think in the
comments below also if you have any
questions don’t hesitate to contact me
on my Facebook page make sure you like
and share this video and thanks for
watching
you
fog machine I think it would be perfect
for Halloween to add your costume for a
smokey effect and also if you want to
add it to a jack-o’-lantern and have a
portable option instead of using dry ice
or heating up a vat of the fog fluid or
lugging around this giant fog machine
that’s the size of like a shoebox when
you’re trick-or-treating but then you’d
have to find like an alternate power
source so this option is completely
portable it runs off of batteries and
it’s really easy to build at least from
my perspective you will need some
soldering skills and depending on how
intricate you want the build to be you
may need some computer programming I use
an Arduino micro to regulate the amount
of smoke that’s coming out so it doesn’t
burn the coils inside of the e-cigarette
but there’s also this option of making a
little switch it looks like you have a
bomb strapped to your chest so I might
second-guess walking around with this
whole setup but it’s Halloween people
are walking around with plastic knives
and masks and blood all over them anyway
so I’ll take my chances so anyway I’ll
show you guys how it works you turn that
on that’ll start heating up your coils
and then there is your smoke it’s coming
out at a pretty quick rate and a little
heat up a little bit and there you go
and if you want to add that effect to
your mask you can add some heat shrink
tubing to this here and then it starts
shooting out and then I just have this
sort of lightly placed here but you guys
get the picture
that look pretty sick walking to a party
having that smoke shooting out of your
mask and if you don’t want to have it
all in constantly guy said there’s this
button here and that’ll continue you can
see when you turn it off you’ll stop so
that we conserve your battery life you
won’t burn out your coils and everyone’s
happy
so I’ll show you guys a brief tutorial
on how I built it here are the
components for the mini smoke machine
you will need the bubble box portable
air pump that also comes with the Stu
being shown here you’ll need some
various sizes of heat shrink tubing to
connect your wires you want to look
specifically for an e-cigarette
that has the variable voltage here on
the bottom there’s a little knob and
then also one that has a different type
of top see how that comes apart into two
different pieces some of them the button
is actually part of the cylinder here
you don’t want that because the only way
to really take this is take this out is
by wiggling with pliers and you don’t
want to damage this recharging port here
so look for one that has this little
plastic portion at the top and it’ll be
much easier to take apart and then
you’ll also want a cartomizer that looks
like this you want it to have this dot
in the middle sort of like a cylinder
see if I get this to focus there we go
so you can see how it’s just a cylinder
there’s nothing around it blocking the
surface this one would not work you can
see because it has a little ring going
outside of that and that will block you
from allowing this to work I’ll show you
guys a little bit more in depth more
detail what I’m talking about
you’ll also need some speaker wire and a
six volt 4 triple-a battery supply
that will power your Arduino your
Arduino is not necessary I’m using the
Arduino micro and you’ll also want a
reed relay it’s a 5 volt DC Reed relay
but like I said you don’t need to have
this computerized it just makes it run a
lot smoother so that it won’t overheat
but if you have this little switch here
it’ll work just as nicely basically this
is a doorbell switch that I ran in
series 2 this speaker wire here and
that’s how you would turn on the coils
and the bubble box air pump will just
run continuously unless you wanted to
add another switch and have it all run
from this but I think it works fine when
you leave it on so I’ll show you guys a
little more in-depth how to put it
together first you want to start by
modifying your project box use a drill
to make holes and back for your charging
port your wires and tubing and then for
your cartomizer you can also use some
grommets to anchor that in place
depending on how nicely you make that
hole for this cartomizer here then you
want to modify your East cigarette by
taking it apart so first I have this
variable voltage one you want to rip off
this thing here that will allow you to
pull the battery out once you wiggle
this free that’s going to come apart
it’s going to be very delicate so be
careful you’re going to pull out all of
the battery and everything so that it’s
sitting on the table and then you’re
going to want to connect a positive wire
to the battery and a negative wire to
the battery and that will look something
like this you want to put one wire here
one wire here obviously soldering you
can try and tape it and hold it in place
but it’s probably not going to work next
you want to pair the tubing that you’re
going to use for the enclosure so you
want to take some wire you want to strip
it really long so that you can poke it
through using a knife to make a little
hole then poke the wire through and then
you want to attach
so we’re how the tubing is set like that
you’re going to attach the tubing to the
inside of that little cylinder there so
you take your wire and you want to have
it touching the center then you want to
force the tubing over top and it’s a
little bit difficult to do I don’t know
if I’ll be able to do it right away on
camera but you see you get the picture
so alright so there we go so now you can
see the tubing is over top of that
little cylinder the wire is touching the
center and adding voltage to the
cartomizer and then what you want to do
is use a grommet to keep this ground
wire attached or touching the edge so I
just force that in there it’s going to
take some practice and some couple tries
to get it but it’s going to look
something like this then you can test it
to your battery and see if it’s working
if that’s working you’re in good shape
so this is what it’s going to kind of
look like once you take it out you’re
gonna want to touch wire here and here
it’s pretty simple now if you don’t want
to use the Arduino which I understand
it’s as simple you take one wire you add
it to this portion here you have your
positive going to red so that would be
the black one okay and then you’re going
to have one wire going to your switch
and then another wire going to your
ground
you press the button everything will
flow around in the circuit and it will
work then you just connect your tubing
from the box to your pump and turn on
the switch if you’re looking for more of
a challenge you can try and integrate
the Arduino first you want to power your
Arduino with
six volts or nine volts depending on
what you want to use 9-volt batteries
will work as well take your red wire and
connect it to the first pin on your
Arduino the way it’s shown in this
diagram here then you want to take your
black wire your ground attached to the
ground there’s little markings on the
Arduino so you can see pretty sure it’s
the second one from the left right here
that should turn on your Arduino and you
can upload your code I’ll leave that in
the description next you want to power
your cartomizer and integrate the relay
your positive is going to go to the
first pin on the relay this is what it
looks like the schematic so your first
pin would be right here and this would
be your second and then these two or
what are powered by your Arduino now
this sort of works like a gate five
volts is a key to open up the gate so as
soon as the Arduino sends five volts to
these two terminals here just one here
it’s going to allow flow of electricity
to go through and go to your cartomizer
so this one’s going to be your positive
this one’s going to be your negative and
negative being your ground so five volts
is going to go to the first pin your
second one is going to go to the ground
so both the six volt battery that’s
powering the Arduino and the Arduino
output voltage ground are going back to
the same pin so you’re going to have to
connect two wires connected into Y then
you’re going to take your ecig battery
and it’s just going to go all the way to
the cartomizer it’s going to be this
portion right here so this is going to
be your positive this is going to
connect here and then this power is
going to come down the Arduino is going
to give this enough power to unlock the
gate and allow power to flow to this
portion which is going to go back up and
power your cartomizer right here so hope
that makes sense and if you have any
questions you can contact me on my
Griet gadget guru channel Facebook page
and leave a link in the description for
those as well as some parts that you
might need for this project here you can
see I added the tubing to the Jack
O’Lantern and it gives it a nice smoky
eerie effect also the the pump with the
air flow coming in makes the candle
flicker gives it kind of a cool glow let
me know what you guys think in the
comments below also if you have any
questions don’t hesitate to contact me
on my Facebook page make sure you like
and share this video and thanks for
watching
you
Please follow and like us:
Be First to Comment