I’ve gathered up some common household
ingredients and a frying pan because
today we’re doing some kitchen chemistry
this is the type of cooking that gets me
excited because I’m trying out recipes
for solid state rocket fuel
[Music]
to get started I’m taking this portable
electric burner outside and away from
anything flammable I’ll add a frying pan
and set the heat to medium-low this lid
should help it heat faster and while
that’s warming up I’ll place one of
these plastic cups on a digital scale
and turn it on when the scale is zeroed
out the weight of the cup I’m ready to
measure portions of these two
ingredients the black bottle is a stump
remover from the garden section of a
local hardware store and I’m using it
because it contains potassium nitrate
and according to the MSDS it contains a
lot of it the second ingredient is plain
white table sugar and I couldn’t resist
a little taste before investing it into
this experiment okay this recipe calls
for a 60/40 mix by weight and I’m gonna
make a hundred gram batch so I’m adding
60 grams of stump remover first followed
by 40 grams of granulated white sugar
that looks good there so I’ll give the
couple a little shake and mix the two
together and then try to pour it neatly
and evenly into the preheated pan over
the course of about five minutes I’ll
need to stir the mix up a little so it
doesn’t burn on the bottom not much
seems to be happening yet but after
about eight minutes I can see some of
the sugar starting to caramelize into a
liquid at this point I’ll need to be
stirring and mixing a little more
frequently and as I do the mixture
begins to liquefy and clump together
turning a golden brown just a couple
minutes later the entire batch looks
like cookie dough and the white powder
is completely mixed in I’ll need some
sort of container to hold this in and
I’m thinking these mega block Legos
might work at this point the mixture is
just running enough that it can be
slowly coaxed into the container it
takes about 60 grams to fill this red
block and when I’ve cooked up a little
more I’ll add that to the blue one it’s
darker in color because it cooked longer
and generally speaking I think the less
it’s cooked the better there’s just a
little bit left over and it’s hot but if
I’m careful I can roll it into a test
piece for measuring the burn rate later
on alright while those are cooling I’ve
got one we can let off just to see how
it looks I’ll get it started with a
propane torch and when the fuel catches
it throws off a nice little flow
and quite a bit of smoke this mix is
four months old and seems to burn a
little slow but it’s still a good show
and you can tell by the melting plastic
that does get pretty hot okay I just
made three more batches of fuel that are
all a little different to the yellow one
I added 30 grams of water and then turn
the heat up to boil the water out after
a couple of minutes the mix turned to a
white mush and was ready when all the
water seemed of cooked out this method
prevented the sugar from caramelizing
but it was a little crumbly when drying
I packed that into this yellow Lego
block and set it aside
another batch was made using a mix of
58% stump remover 29% sugar and this
time I used 13% corn syrup and 30
milliliters of water the water was
cooked out the same way as the last and
then about one gram of homemade rust
powder was added and stirred in
thoroughly when it was ready it looked
like a creamy chocolate frosting and I
packed that into the green Lego I may
have accidentally trapped an air bubble
inside you’ll see this explode later
when we test it for my last batch I
sprinkled some red rust into the mix
while it was still wet and like the
others stirred it until the water had
evaporated out this mix kind of looked
like a delicious red velvet cake but I
wouldn’t recommend eating it I took
samples from each fuel and measured them
all to a length of one inch then time
the burn rates to see how they performed
against each other I was happiest with
the batch made with my homemade rust
because they burned the fastest
I had a few sample scraps left over that
we’re begging to be burned up so I did
that and now here we are with five
samples ready for admission testing the
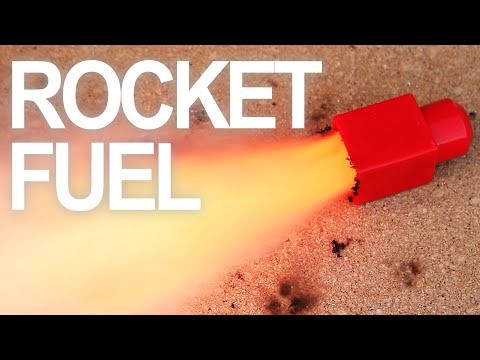
red one I’m really impressed at how fast
it ignites and burns but a little
nervous when it starts spinning out of
control
I’m out of here the blue one lights off
just as powerfully and Bilt’s thrust the
point where it takes off leaving me in a
total whiteout this yellow one was the
uncaring alized version and i got
smarter this time by pointing it down to
prevent it from taking off like the
others
it burns slower than the first two but
the amount of smoke it put off was still
incredible okay so this green one has
the rust in it and it lit up instantly
and then blew up but did you notice how
much faster the burn rate was that’s
amazing for the black one I decided it
was a good idea to hold it in place with
another cement brick and that strategy
seemed to work at least this time I
didn’t get sprayed in the face with
spewing hot rocket fuel overall I think
I’m happiest with these mixtures using
the rust with a different homemade
casing that actually has a nozzle I was
able to get a successful rocket launch
that I think went a couple thousand feet
high well that’s it for this project if
you like these videos please subscribe
and share with your friends I appreciate
your support thanks for watching
[Music]
ingredients and a frying pan because
today we’re doing some kitchen chemistry
this is the type of cooking that gets me
excited because I’m trying out recipes
for solid state rocket fuel
[Music]
to get started I’m taking this portable
electric burner outside and away from
anything flammable I’ll add a frying pan
and set the heat to medium-low this lid
should help it heat faster and while
that’s warming up I’ll place one of
these plastic cups on a digital scale
and turn it on when the scale is zeroed
out the weight of the cup I’m ready to
measure portions of these two
ingredients the black bottle is a stump
remover from the garden section of a
local hardware store and I’m using it
because it contains potassium nitrate
and according to the MSDS it contains a
lot of it the second ingredient is plain
white table sugar and I couldn’t resist
a little taste before investing it into
this experiment okay this recipe calls
for a 60/40 mix by weight and I’m gonna
make a hundred gram batch so I’m adding
60 grams of stump remover first followed
by 40 grams of granulated white sugar
that looks good there so I’ll give the
couple a little shake and mix the two
together and then try to pour it neatly
and evenly into the preheated pan over
the course of about five minutes I’ll
need to stir the mix up a little so it
doesn’t burn on the bottom not much
seems to be happening yet but after
about eight minutes I can see some of
the sugar starting to caramelize into a
liquid at this point I’ll need to be
stirring and mixing a little more
frequently and as I do the mixture
begins to liquefy and clump together
turning a golden brown just a couple
minutes later the entire batch looks
like cookie dough and the white powder
is completely mixed in I’ll need some
sort of container to hold this in and
I’m thinking these mega block Legos
might work at this point the mixture is
just running enough that it can be
slowly coaxed into the container it
takes about 60 grams to fill this red
block and when I’ve cooked up a little
more I’ll add that to the blue one it’s
darker in color because it cooked longer
and generally speaking I think the less
it’s cooked the better there’s just a
little bit left over and it’s hot but if
I’m careful I can roll it into a test
piece for measuring the burn rate later
on alright while those are cooling I’ve
got one we can let off just to see how
it looks I’ll get it started with a
propane torch and when the fuel catches
it throws off a nice little flow
and quite a bit of smoke this mix is
four months old and seems to burn a
little slow but it’s still a good show
and you can tell by the melting plastic
that does get pretty hot okay I just
made three more batches of fuel that are
all a little different to the yellow one
I added 30 grams of water and then turn
the heat up to boil the water out after
a couple of minutes the mix turned to a
white mush and was ready when all the
water seemed of cooked out this method
prevented the sugar from caramelizing
but it was a little crumbly when drying
I packed that into this yellow Lego
block and set it aside
another batch was made using a mix of
58% stump remover 29% sugar and this
time I used 13% corn syrup and 30
milliliters of water the water was
cooked out the same way as the last and
then about one gram of homemade rust
powder was added and stirred in
thoroughly when it was ready it looked
like a creamy chocolate frosting and I
packed that into the green Lego I may
have accidentally trapped an air bubble
inside you’ll see this explode later
when we test it for my last batch I
sprinkled some red rust into the mix
while it was still wet and like the
others stirred it until the water had
evaporated out this mix kind of looked
like a delicious red velvet cake but I
wouldn’t recommend eating it I took
samples from each fuel and measured them
all to a length of one inch then time
the burn rates to see how they performed
against each other I was happiest with
the batch made with my homemade rust
because they burned the fastest
I had a few sample scraps left over that
we’re begging to be burned up so I did
that and now here we are with five
samples ready for admission testing the
red one I’m really impressed at how fast
it ignites and burns but a little
nervous when it starts spinning out of
control
I’m out of here the blue one lights off
just as powerfully and Bilt’s thrust the
point where it takes off leaving me in a
total whiteout this yellow one was the
uncaring alized version and i got
smarter this time by pointing it down to
prevent it from taking off like the
others
it burns slower than the first two but
the amount of smoke it put off was still
incredible okay so this green one has
the rust in it and it lit up instantly
and then blew up but did you notice how
much faster the burn rate was that’s
amazing for the black one I decided it
was a good idea to hold it in place with
another cement brick and that strategy
seemed to work at least this time I
didn’t get sprayed in the face with
spewing hot rocket fuel overall I think
I’m happiest with these mixtures using
the rust with a different homemade
casing that actually has a nozzle I was
able to get a successful rocket launch
that I think went a couple thousand feet
high well that’s it for this project if
you like these videos please subscribe
and share with your friends I appreciate
your support thanks for watching
[Music]
Please follow and like us:
Be First to Comment