
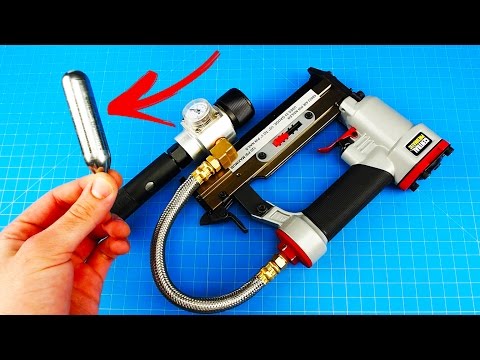
hey everyone this is my modified 23
gauge pin nailer now right here is a
special regulator designed to work with
standard paintball tanks currently I
have an ultraportable setup using this
12 gram co2 cartridge adapter and it can
easily provide power to pneumatic tools
like this one let’s see what this thing
can do okay so let’s take a look at the
traditional setup you probably notice
these aren’t the same models they
actually discontinued this one here
probably to save money by lowering the
quality and I could have settled with
the new version you see here in the box
but there are some really great features
to the older model and overall I just
think this version looks way cooler with
the anodized aluminum it almost looks
like a brass or a copper almost like a
steampunk look to it also the much nicer
switch right here and also this mounting
bracket which these can be removed if I
wanted to 30 print a platform or add
something to move over that way we can
attach our regulator that’s also an
option so what do you think we have a
comment below I’d love to hear what you
have to say on your different
suggestions on how this can be upgraded
and which one do you think looks better
now a funny story I actually had to
secretly swap out the one that was on
display using tools that I found around
the store and I only needed an allen key
and a crescent wrench to remove the
bottom here and then I had to remove a
set screw in the bead that was attached
to the steel cable that was going up the
actual industrial plug here at the
bottom naturally this is the best thing
I could come up with at the time and it
was actually really easy but kind of
nerve-racking because I probably wasn’t
supposed to do that and feeling sort of
guilty I ended up buying the tools that
I actually use to remove it from the
display and I always see the harm done
because in some way I helped the store
by updating their display rack with new
model that they actually were currently
selling so overall I’d say it was worth
it no harm done now I have modified this
version and I removed this what I’m
calling the hammer plunger assembly this
is actually placed right here
traditionally
and whenever you pull this trigger it
rants forward and this little needle tip
is what jams the nail forward hence
hammer plunger I’m actually going to be
swapping out the bottom cap here and
putting it back on to the actual nail
gun so we can see what kind of power it
has in its intended form and I noticed
something really interesting the sticker
right here says that it has 120 psi
maximum so Lily’s thinking that’s
interesting because right here on the
original box it says between 60 and 100
and then on the newer version it says in
the very front 90 psi which is the
operating psi and then again 62
hundredths nothing has really changed
but the new version does not have that
sticker so I don’t know if they’ve
changed the amount of power these things
can take that was the reduction whenever
they change the quality of it or if it’s
just they’re putting a 20 psi as a room
for error just in case someone goes over
120 as the absolute maximum to save
people from destroying their whole rings
and maybe even having this thing damaged
then themselves I mean that will be
horrible if it actually exploded in your
hand because you went over 120 psi but
most the time it’s just going to break
an o-ring and it’s going to start
leaking out all the air I’m definitely
going to match this thing out because I
want to see what this thing can actually
do now this thing doesn’t really stick
on there but you can see what I was
talking about before about creating some
sort of bracket and then whenever we
actually attach the co2 cartridge and
the little handle here it goes to about
there so I can kind of mess around with
this but I think that’ll work pretty
nicely now if you’re into airsoft and
paintball you’re probably familiar with
this sort of mechanism what you have
here is a little cone that is actually
sort of like a needle tip but it’s much
stronger and what that will do is pierce
the top of our co2 cartridge these are
made out of steel under the little thin
diaphragm
that this is going to basically puncture
so you take this here and you place it
in leather like so screw it on and once
you feel the tension right about here
you’re going to twist route it quickly
that way it’s going to seal down on the
little nylon cap that was in that you
saw and there you go you can see the gas
going up now you can see it’s right
there 120 if I was to go over I can
always go back and remove some of that
gas it’s nice to have basically a valve
that can relieve the pressure if you
accidentally go over this thing doesn’t
break let’s bring it back up to 120 psi
because would it sit on a box inside of
each of these cartridges is 12 grams of
liquid co2 now after doing some research
I found that there’s about 800 psi at
any given time within each of these this
is dependent on the temperature of the
gas and as we release it from the
cartridges it’s going to become colder
and the pressure is going drop which
means that after some time we’re going
to have to wait for the temperature to
rise if we want to fire off at the
maximum pressure of 120 psi now let’s
take a look at what temperature we’re at
now with our infrared thermometer
sixty-eight degrees Fahrenheit and let’s
see what the temperature is after we’ve
emptied the cartridge all right so let’s
see what a hundred and twenty psi blast
of air looks like if we just shoot it
without any nails the target is going to
be this packaging container for light
bulb consumer right about on a 20 psi
let’s raise that up just a little bit
there we go so there was still one in
the chamber but that’s actually a
perfect example right there you saw how
much more power came out of firing the
blasts of air and the second try than
the first one so I’m really glad I
didn’t decide to like try this on anyone
just because I thought it was a blast of
air because you can see it does have a
decent amount of penetrating power here
one and about say about half an inch or
so
now if I was just shooting with the
regular air again see still pretty
consistent you can see it’s actually
all right let’s like shoot it right on
the actual co2 cartridge there and it
looks like we’re at 40 degrees so
there’s about 15 degree temperature
difference of insulation from the actual
little metal handle here but when the
actual cartridge were at about 39
degrees actual ice cubes would be around
32 degrees so pretty cold stuff let’s go
ahead and load up a fresh cartridge it’s
actually more air and after we find this
already a couple times so you can see
that as the temperature lowers it
becomes more condensed and you’re not
able to actually get amount of power you
would under the co2 cartridge let’s go
ahead and swap one of these out and test
it out with the nails all right let’s go
ahead and load this thing up we have one
of our clips I guess you could call it
that and it’s telling us with these
arrows which way this is supposed to
face slide it in there this little
mechanism here is pretty cool it
actually allows you to change the length
of nails that you’re going to be using
now in each of these stacks there’s
about 84 nails but see how many we can
actually fire off before this thing runs
out so go ahead and keep an eye on the
right so so 120 psi expired towards the
center so we get about two shots there
three four five six seven eight
[Music]
do a little rapid fire you can keep an
eye on that pressure gauge there as we
go lower it’s not going to shoot and
penetrate into the actual box it’s just
kind of wrecking right off so now it’s
slowly climb actually as I hold this
thing it’s pretty freakin cold it’s like
probably on 40 degrees or so but it’s
zapping heat off my hand and allowing
you the gas to expand a little bit
faster it’s actually past 120 psi we’re
still okay so I guess we’re testing out
lock here yeah so pretty much looking at
like 15 to 20 shots so let’s go ahead
and try this one more time 120 psi each
shot let’s see what this can do one
completely glanced off it two three four
freakin cold 39 40 degrees all right so
yeah we’re looking at like 10 to 15
shots depending on your patience and I
feel like realistically you’re going to
get the first five or so that are going
to be that pressure or you’re going to
actually have a good result it’s pretty
interesting it’s almost like the needler
from halo please post a detailed comment
below and let me know what you think to
me it’s extremely important because you
all inspire me to be a better maker and
reading the feedback you post is a huge
motivator for me I really think this set
up has a lot of potential and I already
have a few ideas in mind harnessing the
power of these co2 cartridges could lead
to some really awesome projects now I’m
totally aware that I could get way
better results using a full-sized
paintball tank I probably have to attach
it to a backpack or belt clip but I
think it’s way more badass to have
everything together in a compact pistol
setup and we’re going to continue
working on this but that’s all I have
for today thanks for tuning in and take
it easy [Music]
gauge pin nailer now right here is a
special regulator designed to work with
standard paintball tanks currently I
have an ultraportable setup using this
12 gram co2 cartridge adapter and it can
easily provide power to pneumatic tools
like this one let’s see what this thing
can do okay so let’s take a look at the
traditional setup you probably notice
these aren’t the same models they
actually discontinued this one here
probably to save money by lowering the
quality and I could have settled with
the new version you see here in the box
but there are some really great features
to the older model and overall I just
think this version looks way cooler with
the anodized aluminum it almost looks
like a brass or a copper almost like a
steampunk look to it also the much nicer
switch right here and also this mounting
bracket which these can be removed if I
wanted to 30 print a platform or add
something to move over that way we can
attach our regulator that’s also an
option so what do you think we have a
comment below I’d love to hear what you
have to say on your different
suggestions on how this can be upgraded
and which one do you think looks better
now a funny story I actually had to
secretly swap out the one that was on
display using tools that I found around
the store and I only needed an allen key
and a crescent wrench to remove the
bottom here and then I had to remove a
set screw in the bead that was attached
to the steel cable that was going up the
actual industrial plug here at the
bottom naturally this is the best thing
I could come up with at the time and it
was actually really easy but kind of
nerve-racking because I probably wasn’t
supposed to do that and feeling sort of
guilty I ended up buying the tools that
I actually use to remove it from the
display and I always see the harm done
because in some way I helped the store
by updating their display rack with new
model that they actually were currently
selling so overall I’d say it was worth
it no harm done now I have modified this
version and I removed this what I’m
calling the hammer plunger assembly this
is actually placed right here
traditionally
and whenever you pull this trigger it
rants forward and this little needle tip
is what jams the nail forward hence
hammer plunger I’m actually going to be
swapping out the bottom cap here and
putting it back on to the actual nail
gun so we can see what kind of power it
has in its intended form and I noticed
something really interesting the sticker
right here says that it has 120 psi
maximum so Lily’s thinking that’s
interesting because right here on the
original box it says between 60 and 100
and then on the newer version it says in
the very front 90 psi which is the
operating psi and then again 62
hundredths nothing has really changed
but the new version does not have that
sticker so I don’t know if they’ve
changed the amount of power these things
can take that was the reduction whenever
they change the quality of it or if it’s
just they’re putting a 20 psi as a room
for error just in case someone goes over
120 as the absolute maximum to save
people from destroying their whole rings
and maybe even having this thing damaged
then themselves I mean that will be
horrible if it actually exploded in your
hand because you went over 120 psi but
most the time it’s just going to break
an o-ring and it’s going to start
leaking out all the air I’m definitely
going to match this thing out because I
want to see what this thing can actually
do now this thing doesn’t really stick
on there but you can see what I was
talking about before about creating some
sort of bracket and then whenever we
actually attach the co2 cartridge and
the little handle here it goes to about
there so I can kind of mess around with
this but I think that’ll work pretty
nicely now if you’re into airsoft and
paintball you’re probably familiar with
this sort of mechanism what you have
here is a little cone that is actually
sort of like a needle tip but it’s much
stronger and what that will do is pierce
the top of our co2 cartridge these are
made out of steel under the little thin
diaphragm
that this is going to basically puncture
so you take this here and you place it
in leather like so screw it on and once
you feel the tension right about here
you’re going to twist route it quickly
that way it’s going to seal down on the
little nylon cap that was in that you
saw and there you go you can see the gas
going up now you can see it’s right
there 120 if I was to go over I can
always go back and remove some of that
gas it’s nice to have basically a valve
that can relieve the pressure if you
accidentally go over this thing doesn’t
break let’s bring it back up to 120 psi
because would it sit on a box inside of
each of these cartridges is 12 grams of
liquid co2 now after doing some research
I found that there’s about 800 psi at
any given time within each of these this
is dependent on the temperature of the
gas and as we release it from the
cartridges it’s going to become colder
and the pressure is going drop which
means that after some time we’re going
to have to wait for the temperature to
rise if we want to fire off at the
maximum pressure of 120 psi now let’s
take a look at what temperature we’re at
now with our infrared thermometer
sixty-eight degrees Fahrenheit and let’s
see what the temperature is after we’ve
emptied the cartridge all right so let’s
see what a hundred and twenty psi blast
of air looks like if we just shoot it
without any nails the target is going to
be this packaging container for light
bulb consumer right about on a 20 psi
let’s raise that up just a little bit
there we go so there was still one in
the chamber but that’s actually a
perfect example right there you saw how
much more power came out of firing the
blasts of air and the second try than
the first one so I’m really glad I
didn’t decide to like try this on anyone
just because I thought it was a blast of
air because you can see it does have a
decent amount of penetrating power here
one and about say about half an inch or
so
now if I was just shooting with the
regular air again see still pretty
consistent you can see it’s actually
all right let’s like shoot it right on
the actual co2 cartridge there and it
looks like we’re at 40 degrees so
there’s about 15 degree temperature
difference of insulation from the actual
little metal handle here but when the
actual cartridge were at about 39
degrees actual ice cubes would be around
32 degrees so pretty cold stuff let’s go
ahead and load up a fresh cartridge it’s
actually more air and after we find this
already a couple times so you can see
that as the temperature lowers it
becomes more condensed and you’re not
able to actually get amount of power you
would under the co2 cartridge let’s go
ahead and swap one of these out and test
it out with the nails all right let’s go
ahead and load this thing up we have one
of our clips I guess you could call it
that and it’s telling us with these
arrows which way this is supposed to
face slide it in there this little
mechanism here is pretty cool it
actually allows you to change the length
of nails that you’re going to be using
now in each of these stacks there’s
about 84 nails but see how many we can
actually fire off before this thing runs
out so go ahead and keep an eye on the
right so so 120 psi expired towards the
center so we get about two shots there
three four five six seven eight
[Music]
do a little rapid fire you can keep an
eye on that pressure gauge there as we
go lower it’s not going to shoot and
penetrate into the actual box it’s just
kind of wrecking right off so now it’s
slowly climb actually as I hold this
thing it’s pretty freakin cold it’s like
probably on 40 degrees or so but it’s
zapping heat off my hand and allowing
you the gas to expand a little bit
faster it’s actually past 120 psi we’re
still okay so I guess we’re testing out
lock here yeah so pretty much looking at
like 15 to 20 shots so let’s go ahead
and try this one more time 120 psi each
shot let’s see what this can do one
completely glanced off it two three four
freakin cold 39 40 degrees all right so
yeah we’re looking at like 10 to 15
shots depending on your patience and I
feel like realistically you’re going to
get the first five or so that are going
to be that pressure or you’re going to
actually have a good result it’s pretty
interesting it’s almost like the needler
from halo please post a detailed comment
below and let me know what you think to
me it’s extremely important because you
all inspire me to be a better maker and
reading the feedback you post is a huge
motivator for me I really think this set
up has a lot of potential and I already
have a few ideas in mind harnessing the
power of these co2 cartridges could lead
to some really awesome projects now I’m
totally aware that I could get way
better results using a full-sized
paintball tank I probably have to attach
it to a backpack or belt clip but I
think it’s way more badass to have
everything together in a compact pistol
setup and we’re going to continue
working on this but that’s all I have
for today thanks for tuning in and take
it easy [Music]
Please follow and like us: