
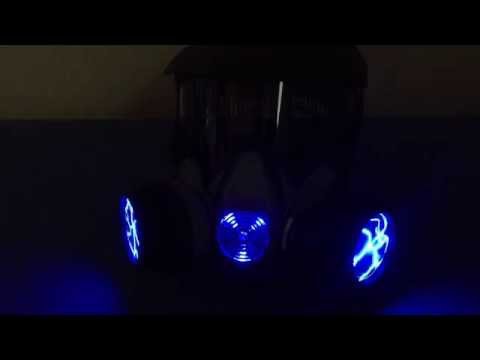
one here’s a quick tutorial on how to
modify your MSA mask to be worn to your
next Halloween party rave or if you just
want to be ready for the next zombie
apocalypse for this project you’ll need
the MSA mask and you want to be sure to
find the ones with a filter that are
black not the gray these will not work
and you can find this at your local home
improvement store for about fifteen
dollars next you’ll need a pocket plasma
these are pretty cool they respond to
touch voice and music they’re pretty
nice because they also come in all these
different colors and they fit like a
glove in this project and I’ll show you
in a sec what I mean by that these are
battery-operated and they come with a
belt clip to be worn so kind of nice and
those are 15 apiece so first by
modifying you’ll have to take apart any
filters and you will destroy the filter
so there’s no going back after you do
this you want to gut the inside there’s
all these little pebbles and filter
filter material so you want to gut that
and then I just used a grocery bag to
fill in the void the cut is about two
and a half across by two down and I just
add that up using a sharpie and cut out
the dimensions so that it fits perfectly
over now if you’d like you can also cut
around using an exacto knife I remove
the little grating here I thought it
looked nice sort of having a little bit
more of the light exposed just gives it
a more professional look and look out
what I was talking about this glass here
I didn’t sand this or anything it
literally fits in there perfectly and
it’s so such a good fit doesn’t even
fall out when I shake it like this so
pretty neat how everything just sort of
worked out and the voice recognition or
the voice respond so you can see how
it’s sort of responding to my voice and
while I speak and if you tap it it
lights up too
and I’m just going to turn it on all the
way full power and then I just sort of
pops back on real nice and simple and
then on the other side as well and these
go on pretty firm so whatever you’re
doing you don’t have to worry about
these falling and cracking and then I
modified this by just putting some
earrings I just loop them through again
and through an o-ring so that it can
hold these little straps a little more
cleanly and then the bottom here I sort
of saw that looks like a radioactive
symbol so I put three LEDs in parallel
and hook them up using a cr2025 battery
so I got that on now so looks very nice
and what I mean by parallel you take
your LEDs and there’s a long and a short
wire and you want to put all the long
ones to the other twist them together
all the short ones together and then
twist those together then making sure
that each twisted ends don’t touch the
longer ones that you’re positive and the
negative are the shorter ones you want
to combine them into your battery and
then a switch if you’d like so this is a
cr2025 battery right here and be sure to
buy these online if you want a better
deal look something like this
a little button cell and it fits in the
holder very nicely so I would recommend
picking up the holder as well unless you
just want to tape everything together if
you’re not really that picky so like I
said you want to put the positive and
you’re going to have to test it out
but the schematic is pretty simple just
look up wiring LEDs in parallel and it’s
you should have no problem
so I’m going to turn out the lights just
you guys can get a better look so you
can see that biohazard I’m sorry the
radioactive symbol turns out pretty nice
I also use a little bit of adhesive foam
and that just sort of fills in the other
areas the voids and I don’t think it
looks pretty nice got this the pretty
cool electricity going on here and the
cool thing about these types of
batteries they work really well with the
5 millimeter LEDs that I have and you
don’t even need to have any resistors so
if you’d like you can also place other
LEDs real quickly you don’t have to wire
them up like I did you can if you’re
only going to use this mask for one
party or whatever so basically you can
just connect the LED to the lights so if
you want to put like a light up here or
maybe here or inside the mask to give it
like a glow you can do that real simply
and all you’d have to do is just tape
the LED to the correct sides of the
cr2025 and that’s a three volt battery
so it’s pretty simple let me know what
you guys think if you guys enjoyed this
tutorial and found it useful thanks for
watching
[Music]
you
modify your MSA mask to be worn to your
next Halloween party rave or if you just
want to be ready for the next zombie
apocalypse for this project you’ll need
the MSA mask and you want to be sure to
find the ones with a filter that are
black not the gray these will not work
and you can find this at your local home
improvement store for about fifteen
dollars next you’ll need a pocket plasma
these are pretty cool they respond to
touch voice and music they’re pretty
nice because they also come in all these
different colors and they fit like a
glove in this project and I’ll show you
in a sec what I mean by that these are
battery-operated and they come with a
belt clip to be worn so kind of nice and
those are 15 apiece so first by
modifying you’ll have to take apart any
filters and you will destroy the filter
so there’s no going back after you do
this you want to gut the inside there’s
all these little pebbles and filter
filter material so you want to gut that
and then I just used a grocery bag to
fill in the void the cut is about two
and a half across by two down and I just
add that up using a sharpie and cut out
the dimensions so that it fits perfectly
over now if you’d like you can also cut
around using an exacto knife I remove
the little grating here I thought it
looked nice sort of having a little bit
more of the light exposed just gives it
a more professional look and look out
what I was talking about this glass here
I didn’t sand this or anything it
literally fits in there perfectly and
it’s so such a good fit doesn’t even
fall out when I shake it like this so
pretty neat how everything just sort of
worked out and the voice recognition or
the voice respond so you can see how
it’s sort of responding to my voice and
while I speak and if you tap it it
lights up too
and I’m just going to turn it on all the
way full power and then I just sort of
pops back on real nice and simple and
then on the other side as well and these
go on pretty firm so whatever you’re
doing you don’t have to worry about
these falling and cracking and then I
modified this by just putting some
earrings I just loop them through again
and through an o-ring so that it can
hold these little straps a little more
cleanly and then the bottom here I sort
of saw that looks like a radioactive
symbol so I put three LEDs in parallel
and hook them up using a cr2025 battery
so I got that on now so looks very nice
and what I mean by parallel you take
your LEDs and there’s a long and a short
wire and you want to put all the long
ones to the other twist them together
all the short ones together and then
twist those together then making sure
that each twisted ends don’t touch the
longer ones that you’re positive and the
negative are the shorter ones you want
to combine them into your battery and
then a switch if you’d like so this is a
cr2025 battery right here and be sure to
buy these online if you want a better
deal look something like this
a little button cell and it fits in the
holder very nicely so I would recommend
picking up the holder as well unless you
just want to tape everything together if
you’re not really that picky so like I
said you want to put the positive and
you’re going to have to test it out
but the schematic is pretty simple just
look up wiring LEDs in parallel and it’s
you should have no problem
so I’m going to turn out the lights just
you guys can get a better look so you
can see that biohazard I’m sorry the
radioactive symbol turns out pretty nice
I also use a little bit of adhesive foam
and that just sort of fills in the other
areas the voids and I don’t think it
looks pretty nice got this the pretty
cool electricity going on here and the
cool thing about these types of
batteries they work really well with the
5 millimeter LEDs that I have and you
don’t even need to have any resistors so
if you’d like you can also place other
LEDs real quickly you don’t have to wire
them up like I did you can if you’re
only going to use this mask for one
party or whatever so basically you can
just connect the LED to the lights so if
you want to put like a light up here or
maybe here or inside the mask to give it
like a glow you can do that real simply
and all you’d have to do is just tape
the LED to the correct sides of the
cr2025 and that’s a three volt battery
so it’s pretty simple let me know what
you guys think if you guys enjoyed this
tutorial and found it useful thanks for
watching
[Music]
you
Please follow and like us:
Be First to Comment