
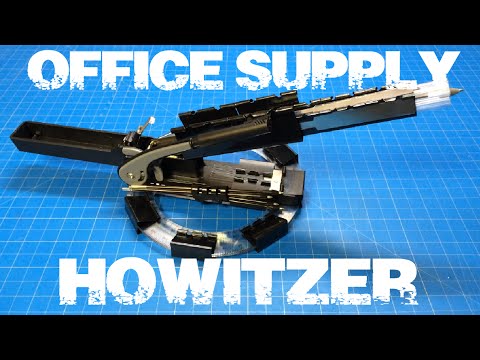
hey everyone this is my office applied
mortar or missile launcher it’s pretty
cool because it has four barrels an
aiming system two ammo compartments and
a trigger I’ll just show you some
different angles you can see four
barrels from the front and the side here
these are just for support as well as
these are for looks and for support of
the barrel they’re called 1 inch chrome
fasteners your ammunition are these ink
cartridges whether you load it up you
slide them down the barrel one at a time
and you make sure that they gravity feed
down the barrel and they want to be
touching the black portion of the
stapler then you want to take your
trigger and there’s a little catch here
this hook going to fall into that black
portion and then hook on right here so
there yeah and then you want to make
sure the ammunition slides down the
barrel you can see all those slid down
there and they’re resting on that
portion and then if you want to change
your arc you just move this and without
it it would sort of just move all over
the place so it’s important that you
have this arc system thing and then you
want to fire
aim and press down on this so it fires
them pretty hard and with the arc you
can get some pretty accurate shots
they’re weighted in the front so they’re
going to fly fairly straight and I’ll
show you guys real quick how to make it
for this project you will need pliers
needle nose pliers for hexagonal shaped
end tubes you can see they’re very nice
because they’ll fit inside of the binder
clips and they’ll stack on each other on
the flat edges you’ll need a full-sized
stapler
the ultrafine pen cap one protractor and
four compasses these three items you can
get from the dollar store you’ll need
some really small Oh rings I got these
in an assortment pack from Harbor
Freight you’ll also need two large
binder clips 15 medium to small and 8
micro you also need this one inch
pronged fastener it has an adhesive side
you peel off this piece of paper here
and you can stick it to the surface of
your barrel and you’re going to need
three of these although I would
recommend just buying the pack just
because you’re going to be using these
in my future projects I’m sure as well
as these two-inch prong fasteners this
is going to serve as your catch and it’s
nice because they’re very sturdy and
easy to work with and of course you’ll
need some duct tape first what you want
to do is modify your stapler disassemble
it and remove or Bend these little tabs
out of the way because they’re going to
obstruct your barrel I cut mine off with
a dremel tool then what you want to do
is to preserve this little piece of
plastic here and see how fragile it is
you have that really tiny slab of
plastic and if that breaks this thing is
ruined so you want to sandwich this in
between four of these o-rings
two on each side so to do that you want
to add the bar back in and put on your
spring hold that in place add to wash of
the o-rings and you want to make sure
you put this back on with this these
three bars facing backwards so that goes
on like that and then you want to add
two more of the Rings
put this back into the barrel making
sure that the o-rings stay on and then
just keep this in place you want to put
this pin back through and then just
slide this portion back on and it just
pops in there don’t worry about it
probably won’t break and if it does
doesn’t really matter because this is
all dollar store stuff there we go
okay so now you see the wall the o-rings
are in place and it’s protected a little
bumper system so it doesn’t break off
okay very simple next what you want to
do is build your trigger now your
trigger is sort of complicated you want
to take one of these two-inch problem
fasteners and you want to cut a portion
using a tool you can use tin snips or if
you have like wire cutters or something
you want to take that and you want to
make it you sort of need to eyeball it I
would say it’s about an inch and a half
you can see so you want to cut that bend
the tabs down just a little bit to make
a hook and then bend it one more time
around one of these mini
binder clips you can see right here so
you can see how it’s hooked it sort of
looks like a Z and you want to bend that
backwards so that doesn’t slide out and
then to stabilize it you use some duct
tape keep it in place and this is a
little complicated here this is your
catch this is what’s grabbing onto this
portion of the stapler here it’s very
important that you make this very
precise
and all it has to do is really be this
angled portion what I did is I put mine
in a vise pinch this in and then slowly
bent it using the tools to hold it in
place and it basically just needs to be
hooked and off so they don’t grab on to
this portion of the stapler so that
it’ll slide like this and that’s how you
would fire it and you can also add one
more mini binder clip here and that will
serve as a nice surface for your trigger
and remember this is how you would fire
it you would take your catch here pull
back and then it hooks on like so so if
you don’t want to fire you can actually
have this this can be completed right
now if you’d like you can fire staples
as soon as you cut this this portion
here and staples are kind of cool
because if they’re long portion staplers
sort of like this whenever they hit
they’ll explode because they’ll break
apart so that’s an option if you don’t
want to go the full the full project
this is pretty simple but I like the way
the full one looks but if you want to
fire different ammunitions you can
always disassemble the barrel and just
fire regular staples so just goes like
that and then to fire you just push this
down but of course you don’t have that
aiming system and all those other
features that are pretty cool so next
what you want to do is take your
protractor your protractor is right here
it’s going to have this little handle
that’s on there
you want to cut that off and then I send
it mine nice so that it didn’t have any
jagged edges or anything and then what
you want to do is attach
attach your protractor to the bottom of
the stapler here so what you want to do
is get some of these micro binder clips
then you take your protractor and I
don’t have a second protractor on hand
but right here you have these little
tabs here you just want to go like that
and you can see how I have it sort of
assembled give your two micro binder
clips holding the protractor on there
and then to keep everything symmetrical
you want to add another two so that it’s
not offset and then believe there’s one
more right in here right right
underneath these medium-sized binder
clips so you’ll need one two three four
five six
Micro binder clips right there and then
you’ll need if you don’t want to have
these things here you don’t need them
it’s just for looks in it I think it
adds some support you definitely need
the media mitre clips here here so these
two to keep the and then one on the back
here
to keep this thing anchored on here next
what you do is you build the barrel
these are two large binder clips but
first you want to add two medium sized
binder clips on the inside so there’s
two mediums here once here once here
another one now these are both the same
size just two and then you’ll need
another two large binder clips to clip
over top of those and they’ll be
sandwiched in between so you’ll have the
mini the medium below and our inside of
the large okay and then what you do the
reason you do that is because you want
to bridge the gap between the this
barrel here
and for that to happen you need to have
this large binder clip hanging off the
edge of the actual stapler itself so you
can see stapler actually ends you can
take this out if you like staple ends
right there okay so to add this in you
would just sort of go like this and
slide it in very simple so there you go
right for your added barrel just take
this out and show you you’re going to
need three medium size binder clips four
of these hexagonal tube pens you need to
be hexagonal because otherwise you see
how they sort of stack on each other the
flat edges that’s important otherwise
they’ll want to shoot out and then you
want to get these one-inch fasteners
they have an adhesive side and you don’t
need these although it keeps the whole
thing structured because now these three
binder clips are attached to each other
and they’re not going to move around and
I think it makes a little cool as well
just having the metallic look and then
if you want this is the portion of the
protractor that’s used for like pushing
in the paper that will actually sit
right in between these barrels here you
don’t need it but I thought it looked
kind of cool so that’s an added feature
and then to put it in there you sort of
Bend this down and push it in place and
there you are then you can put your
ammunition here and you can also store
to a munitions and top barrels there and
then for the protractor you’ll just need
a little bit of duct tape literally just
one one wrap around you don’t want it to
go like twice around you want to just
wrap it once and cut it off and then add
this pen cap add a mini or sorry a small
binder clip to the pen cap portion
you can see right here from simple and
you’re going to need to wiggle it down
the barrel so you might want to put this
on before you put the protractor into
the stapler but it’s whatever doesn’t
matter and then you can see how this
little tab here grabs onto that small
binder clip whenever you raise it and I
think that’s it of course if you would
like you can use for protractors I’m
sorry for compasses see I used four four
and they’re stacked on each other two on
each side you can use no trap nope no
compasses at all although I think that
it keeps this a lot more stable when
it’s firing and it looks cooler sort of
like a missile pad or something like
that but you can use two you can use
four I’d recommend four just because it
gives these binder clips something to
grip onto more so than just one so
depending on how much you want to spend
and how much you have already at your
disposal will make up for how your
missile launcher looks or mortar I’m
going to show you guys a real quick
test-fire again if you’re firing clip
grab on to the shuttle make sure your
ammunition slides back you can adjust
your sight and your aim arc any weight
your target and fire so you can see it
fires pretty easily and has enough power
so it’s going to have enough accuracy in
distance especially with this little arc
system and because these are weighted at
the front this little plastic portion
will fly pretty straight and you won’t
hurt anyone because they’re blunt tips
you might just market their white shirt
which would be pretty funny so let me
know what you guys think in the comments
below
please feel free to share this on
whatever social media site you use and
also click that like button thanks for
watching
mortar or missile launcher it’s pretty
cool because it has four barrels an
aiming system two ammo compartments and
a trigger I’ll just show you some
different angles you can see four
barrels from the front and the side here
these are just for support as well as
these are for looks and for support of
the barrel they’re called 1 inch chrome
fasteners your ammunition are these ink
cartridges whether you load it up you
slide them down the barrel one at a time
and you make sure that they gravity feed
down the barrel and they want to be
touching the black portion of the
stapler then you want to take your
trigger and there’s a little catch here
this hook going to fall into that black
portion and then hook on right here so
there yeah and then you want to make
sure the ammunition slides down the
barrel you can see all those slid down
there and they’re resting on that
portion and then if you want to change
your arc you just move this and without
it it would sort of just move all over
the place so it’s important that you
have this arc system thing and then you
want to fire
aim and press down on this so it fires
them pretty hard and with the arc you
can get some pretty accurate shots
they’re weighted in the front so they’re
going to fly fairly straight and I’ll
show you guys real quick how to make it
for this project you will need pliers
needle nose pliers for hexagonal shaped
end tubes you can see they’re very nice
because they’ll fit inside of the binder
clips and they’ll stack on each other on
the flat edges you’ll need a full-sized
stapler
the ultrafine pen cap one protractor and
four compasses these three items you can
get from the dollar store you’ll need
some really small Oh rings I got these
in an assortment pack from Harbor
Freight you’ll also need two large
binder clips 15 medium to small and 8
micro you also need this one inch
pronged fastener it has an adhesive side
you peel off this piece of paper here
and you can stick it to the surface of
your barrel and you’re going to need
three of these although I would
recommend just buying the pack just
because you’re going to be using these
in my future projects I’m sure as well
as these two-inch prong fasteners this
is going to serve as your catch and it’s
nice because they’re very sturdy and
easy to work with and of course you’ll
need some duct tape first what you want
to do is modify your stapler disassemble
it and remove or Bend these little tabs
out of the way because they’re going to
obstruct your barrel I cut mine off with
a dremel tool then what you want to do
is to preserve this little piece of
plastic here and see how fragile it is
you have that really tiny slab of
plastic and if that breaks this thing is
ruined so you want to sandwich this in
between four of these o-rings
two on each side so to do that you want
to add the bar back in and put on your
spring hold that in place add to wash of
the o-rings and you want to make sure
you put this back on with this these
three bars facing backwards so that goes
on like that and then you want to add
two more of the Rings
put this back into the barrel making
sure that the o-rings stay on and then
just keep this in place you want to put
this pin back through and then just
slide this portion back on and it just
pops in there don’t worry about it
probably won’t break and if it does
doesn’t really matter because this is
all dollar store stuff there we go
okay so now you see the wall the o-rings
are in place and it’s protected a little
bumper system so it doesn’t break off
okay very simple next what you want to
do is build your trigger now your
trigger is sort of complicated you want
to take one of these two-inch problem
fasteners and you want to cut a portion
using a tool you can use tin snips or if
you have like wire cutters or something
you want to take that and you want to
make it you sort of need to eyeball it I
would say it’s about an inch and a half
you can see so you want to cut that bend
the tabs down just a little bit to make
a hook and then bend it one more time
around one of these mini
binder clips you can see right here so
you can see how it’s hooked it sort of
looks like a Z and you want to bend that
backwards so that doesn’t slide out and
then to stabilize it you use some duct
tape keep it in place and this is a
little complicated here this is your
catch this is what’s grabbing onto this
portion of the stapler here it’s very
important that you make this very
precise
and all it has to do is really be this
angled portion what I did is I put mine
in a vise pinch this in and then slowly
bent it using the tools to hold it in
place and it basically just needs to be
hooked and off so they don’t grab on to
this portion of the stapler so that
it’ll slide like this and that’s how you
would fire it and you can also add one
more mini binder clip here and that will
serve as a nice surface for your trigger
and remember this is how you would fire
it you would take your catch here pull
back and then it hooks on like so so if
you don’t want to fire you can actually
have this this can be completed right
now if you’d like you can fire staples
as soon as you cut this this portion
here and staples are kind of cool
because if they’re long portion staplers
sort of like this whenever they hit
they’ll explode because they’ll break
apart so that’s an option if you don’t
want to go the full the full project
this is pretty simple but I like the way
the full one looks but if you want to
fire different ammunitions you can
always disassemble the barrel and just
fire regular staples so just goes like
that and then to fire you just push this
down but of course you don’t have that
aiming system and all those other
features that are pretty cool so next
what you want to do is take your
protractor your protractor is right here
it’s going to have this little handle
that’s on there
you want to cut that off and then I send
it mine nice so that it didn’t have any
jagged edges or anything and then what
you want to do is attach
attach your protractor to the bottom of
the stapler here so what you want to do
is get some of these micro binder clips
then you take your protractor and I
don’t have a second protractor on hand
but right here you have these little
tabs here you just want to go like that
and you can see how I have it sort of
assembled give your two micro binder
clips holding the protractor on there
and then to keep everything symmetrical
you want to add another two so that it’s
not offset and then believe there’s one
more right in here right right
underneath these medium-sized binder
clips so you’ll need one two three four
five six
Micro binder clips right there and then
you’ll need if you don’t want to have
these things here you don’t need them
it’s just for looks in it I think it
adds some support you definitely need
the media mitre clips here here so these
two to keep the and then one on the back
here
to keep this thing anchored on here next
what you do is you build the barrel
these are two large binder clips but
first you want to add two medium sized
binder clips on the inside so there’s
two mediums here once here once here
another one now these are both the same
size just two and then you’ll need
another two large binder clips to clip
over top of those and they’ll be
sandwiched in between so you’ll have the
mini the medium below and our inside of
the large okay and then what you do the
reason you do that is because you want
to bridge the gap between the this
barrel here
and for that to happen you need to have
this large binder clip hanging off the
edge of the actual stapler itself so you
can see stapler actually ends you can
take this out if you like staple ends
right there okay so to add this in you
would just sort of go like this and
slide it in very simple so there you go
right for your added barrel just take
this out and show you you’re going to
need three medium size binder clips four
of these hexagonal tube pens you need to
be hexagonal because otherwise you see
how they sort of stack on each other the
flat edges that’s important otherwise
they’ll want to shoot out and then you
want to get these one-inch fasteners
they have an adhesive side and you don’t
need these although it keeps the whole
thing structured because now these three
binder clips are attached to each other
and they’re not going to move around and
I think it makes a little cool as well
just having the metallic look and then
if you want this is the portion of the
protractor that’s used for like pushing
in the paper that will actually sit
right in between these barrels here you
don’t need it but I thought it looked
kind of cool so that’s an added feature
and then to put it in there you sort of
Bend this down and push it in place and
there you are then you can put your
ammunition here and you can also store
to a munitions and top barrels there and
then for the protractor you’ll just need
a little bit of duct tape literally just
one one wrap around you don’t want it to
go like twice around you want to just
wrap it once and cut it off and then add
this pen cap add a mini or sorry a small
binder clip to the pen cap portion
you can see right here from simple and
you’re going to need to wiggle it down
the barrel so you might want to put this
on before you put the protractor into
the stapler but it’s whatever doesn’t
matter and then you can see how this
little tab here grabs onto that small
binder clip whenever you raise it and I
think that’s it of course if you would
like you can use for protractors I’m
sorry for compasses see I used four four
and they’re stacked on each other two on
each side you can use no trap nope no
compasses at all although I think that
it keeps this a lot more stable when
it’s firing and it looks cooler sort of
like a missile pad or something like
that but you can use two you can use
four I’d recommend four just because it
gives these binder clips something to
grip onto more so than just one so
depending on how much you want to spend
and how much you have already at your
disposal will make up for how your
missile launcher looks or mortar I’m
going to show you guys a real quick
test-fire again if you’re firing clip
grab on to the shuttle make sure your
ammunition slides back you can adjust
your sight and your aim arc any weight
your target and fire so you can see it
fires pretty easily and has enough power
so it’s going to have enough accuracy in
distance especially with this little arc
system and because these are weighted at
the front this little plastic portion
will fly pretty straight and you won’t
hurt anyone because they’re blunt tips
you might just market their white shirt
which would be pretty funny so let me
know what you guys think in the comments
below
please feel free to share this on
whatever social media site you use and
also click that like button thanks for
watching
Please follow and like us:
Be First to Comment