
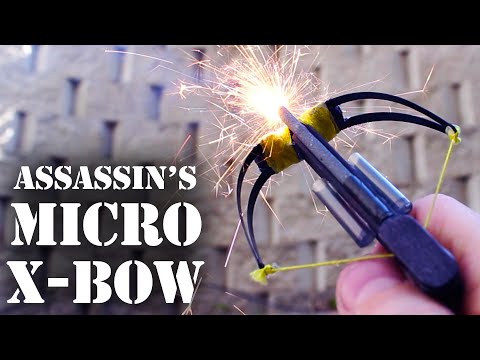
this article of desktop weaponry
accommodates multiple rounds of
ammunition launches exploding tip
crossbow bolts and slings wooden matches
over 30 feet away in this project
returning some ordinary household items
into a surprisingly versatile micro
crossbow to start this project we’ll
need a handful of popsicle sticks and a
template showing how to cut them you’ll
see how to get this one for free in just
a minute
once the popsicle sticks are all marked
we can use something like a pair of
gardening shears to cut the pieces to
size without ever having to make a
single measurement you can get your free
template by clicking the icon or by
following the link in the description
alright now that our pieces are cut
let’s paint them completely black and
that could be done quickly and easily
with a permanent marker the ink will
probably take just a minute to dry so
now would be a good time to round up
some metal hair clips we’re only going
to need two of them you can see with a
little manipulation the inside clip
breaks off cleanly at the bottom
now the first step of assembly is
securing the clips to the wooden
supports with a bit of hot glue so that
when it cools the limbs are arching away
from each other in a bow shave now let’s
go ahead and add some hot glue to the
inside of the arch so we can press the
second support firmly into place I
cleaned up the excess glue with a
utility knife and now we should be good
to set this to the side and move on to
making the pistol grip the outer rail
needs just enough hot glue to secure the
smaller rail spacer flush with the tip
you might notice I dropped the top down
a touch to form a little groove about
half a matchstick deep now it’s
important this flight channel stays
clean so we need to check for any excess
glue and ensure it all gets removed at
this point we can attach the handle
support right behind the spacer then
glue the last rail in place you can see
I left a matchstick in the flight
channel and that’s to ensure I get the
spacing right
to finish the frame all we need to do is
glue the pistol grip panels so they
overhang slightly at the back all right
we’re gonna need a very shallow groove
for catching the bowstring so let’s try
using a knife to carefully whittle out a
small catch on the upper rails in line
with the front of the pistol grip while
we’re at it why don’t we use a bit of
sandpaper to lightly round the edges of
the barrels to help prevent the
bowstring from fraying and breaking
don’t worry about messing up the pain
job it’s super easy to touch up and make
good as new now the Crossville starts to
come together as the tip of the gun
rails are pressed firmly into a dab of
hot glue on the inside of the bow and
about 30 seconds of steady pressure
works well to keep the connections
strong as the glue begins to cool I
chose to glue some Phillips on the sides
for added support and durability you
should be able to see the flight groove
is slightly higher than the limb
supports now when a matchsticks place in
the channel it’ll hopefully slide freely
and without restriction alright it’s
time to pick out a bowstring this is
embroidery floss from the craft section
of a local Super Center and I’ll be
using yellow now if we push one end of
the floss to the hole in the tip tie it
in place with a double knot and now a
bit of hot glue it should keep the knot
from unraveling before we go any further
I’m thinking we need a second string
glued to the backside of the bow and
wrapped around the support eight to ten
times on each side
this will reinforce the connections
exponentially and a small dab of hot
glue should keep the string from
unraveling alright let’s get back to the
bowstring we’ll need to twist it around
a few times to keep it tight then flex
the hair clips a little before cinching
down another double knot you can see
this will keep tension on the string and
increase the draw way to the bow of
course we’ll need add some glue to this
knot as well and trim off the excess
thread but other than that our basic
crossbow is finished let’s try it out by
cocking the bowstring inserting a wooden
match for ammunition and using our
thumbnail to press up gently on the
string you can see the wooden bolts fire
off an incredible speeds in over 30 feet
away now occasionally the string will
jump the bolt and fail to launch so
let’s address that challenge with some
pieces from the scrap pile if we glue
them to the back and create a makeshift
retention spring it’ll fire the bolt
every time the finger holds the bolt so
securely that it can be fired from any
angle even upside down I went ahead and
wrapped the handle with yellow thread
and added a couple of mini clips for
additional ammo these side mount Quivers
are simply made from a plastic drinking
straw I cut two small pieces from off
the straw capped one end with some hot
glue and attach them to the side of the
barrel at a bit of an angle now when the
bolts are inserted there’s plenty of
tension to hold them in place even if
the crossbow is completely inverted with
this simple modification we’ve tripled
our easy access ammo which should give a
nice edge to our gameplay
now let’s take it to the next level with
some contact explosive bolt heads
I made these ones by securing individual
snappers to the tips of the sticks with
a bit of electrical tape this is super
awesome because now our bolts make a
bang when they impact a hard target of
course this should only be done outdoors
and with adults supervision well now you
know how to turn some simple household
items into a powerful and amazingly
versatile micro crossbow by the way if
you can’t find any embroidery floss try
twisting about four strands of dental
floss instead it works great and it’s
slippery enough to and fire a bolt
that’s already set in place well that’s
it for now if you liked this project
perhaps you’ll like some of my others
check them out at the king of random
calm before you go I wanted to give a
quick shout out to my friends at Sonic
comm they originally inspired this
project and gave me special permission
to give you a free copy of the original
micro crossbow project that’s where
you’ll find detailed instructions and a
copy of the crossbow template that I
used in this video just click the
annotation or check the description for
how to get it and please be sure to
visit and subscribe to the sonic dad
channel as well they’ve got tons of
other household projects for you to try
[Music]
accommodates multiple rounds of
ammunition launches exploding tip
crossbow bolts and slings wooden matches
over 30 feet away in this project
returning some ordinary household items
into a surprisingly versatile micro
crossbow to start this project we’ll
need a handful of popsicle sticks and a
template showing how to cut them you’ll
see how to get this one for free in just
a minute
once the popsicle sticks are all marked
we can use something like a pair of
gardening shears to cut the pieces to
size without ever having to make a
single measurement you can get your free
template by clicking the icon or by
following the link in the description
alright now that our pieces are cut
let’s paint them completely black and
that could be done quickly and easily
with a permanent marker the ink will
probably take just a minute to dry so
now would be a good time to round up
some metal hair clips we’re only going
to need two of them you can see with a
little manipulation the inside clip
breaks off cleanly at the bottom
now the first step of assembly is
securing the clips to the wooden
supports with a bit of hot glue so that
when it cools the limbs are arching away
from each other in a bow shave now let’s
go ahead and add some hot glue to the
inside of the arch so we can press the
second support firmly into place I
cleaned up the excess glue with a
utility knife and now we should be good
to set this to the side and move on to
making the pistol grip the outer rail
needs just enough hot glue to secure the
smaller rail spacer flush with the tip
you might notice I dropped the top down
a touch to form a little groove about
half a matchstick deep now it’s
important this flight channel stays
clean so we need to check for any excess
glue and ensure it all gets removed at
this point we can attach the handle
support right behind the spacer then
glue the last rail in place you can see
I left a matchstick in the flight
channel and that’s to ensure I get the
spacing right
to finish the frame all we need to do is
glue the pistol grip panels so they
overhang slightly at the back all right
we’re gonna need a very shallow groove
for catching the bowstring so let’s try
using a knife to carefully whittle out a
small catch on the upper rails in line
with the front of the pistol grip while
we’re at it why don’t we use a bit of
sandpaper to lightly round the edges of
the barrels to help prevent the
bowstring from fraying and breaking
don’t worry about messing up the pain
job it’s super easy to touch up and make
good as new now the Crossville starts to
come together as the tip of the gun
rails are pressed firmly into a dab of
hot glue on the inside of the bow and
about 30 seconds of steady pressure
works well to keep the connections
strong as the glue begins to cool I
chose to glue some Phillips on the sides
for added support and durability you
should be able to see the flight groove
is slightly higher than the limb
supports now when a matchsticks place in
the channel it’ll hopefully slide freely
and without restriction alright it’s
time to pick out a bowstring this is
embroidery floss from the craft section
of a local Super Center and I’ll be
using yellow now if we push one end of
the floss to the hole in the tip tie it
in place with a double knot and now a
bit of hot glue it should keep the knot
from unraveling before we go any further
I’m thinking we need a second string
glued to the backside of the bow and
wrapped around the support eight to ten
times on each side
this will reinforce the connections
exponentially and a small dab of hot
glue should keep the string from
unraveling alright let’s get back to the
bowstring we’ll need to twist it around
a few times to keep it tight then flex
the hair clips a little before cinching
down another double knot you can see
this will keep tension on the string and
increase the draw way to the bow of
course we’ll need add some glue to this
knot as well and trim off the excess
thread but other than that our basic
crossbow is finished let’s try it out by
cocking the bowstring inserting a wooden
match for ammunition and using our
thumbnail to press up gently on the
string you can see the wooden bolts fire
off an incredible speeds in over 30 feet
away now occasionally the string will
jump the bolt and fail to launch so
let’s address that challenge with some
pieces from the scrap pile if we glue
them to the back and create a makeshift
retention spring it’ll fire the bolt
every time the finger holds the bolt so
securely that it can be fired from any
angle even upside down I went ahead and
wrapped the handle with yellow thread
and added a couple of mini clips for
additional ammo these side mount Quivers
are simply made from a plastic drinking
straw I cut two small pieces from off
the straw capped one end with some hot
glue and attach them to the side of the
barrel at a bit of an angle now when the
bolts are inserted there’s plenty of
tension to hold them in place even if
the crossbow is completely inverted with
this simple modification we’ve tripled
our easy access ammo which should give a
nice edge to our gameplay
now let’s take it to the next level with
some contact explosive bolt heads
I made these ones by securing individual
snappers to the tips of the sticks with
a bit of electrical tape this is super
awesome because now our bolts make a
bang when they impact a hard target of
course this should only be done outdoors
and with adults supervision well now you
know how to turn some simple household
items into a powerful and amazingly
versatile micro crossbow by the way if
you can’t find any embroidery floss try
twisting about four strands of dental
floss instead it works great and it’s
slippery enough to and fire a bolt
that’s already set in place well that’s
it for now if you liked this project
perhaps you’ll like some of my others
check them out at the king of random
calm before you go I wanted to give a
quick shout out to my friends at Sonic
comm they originally inspired this
project and gave me special permission
to give you a free copy of the original
micro crossbow project that’s where
you’ll find detailed instructions and a
copy of the crossbow template that I
used in this video just click the
annotation or check the description for
how to get it and please be sure to
visit and subscribe to the sonic dad
channel as well they’ve got tons of
other household projects for you to try
[Music]
Please follow and like us:
Be First to Comment