this video is sponsored by brilliant org
check the link in the description for a
discount on your first subscription hey
guys I’m Nate welcome back to the
workshop today we’re going to be
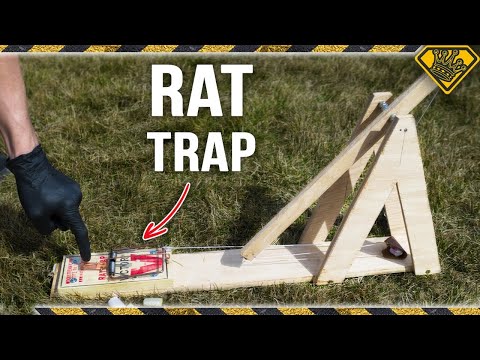
building a desktop version of a seized
weapon called a trebuchet this applies
to us a pretty basic I have here a 1/2
inch thick piece of plywood which is
about 2 feet by 2 feet and this will
actually be extra we’ll have some left
over after our build we’ve got some very
strong string this will be used in a
sling portion of our trebuchet I’ve got
a thin metal rod which are going to use
as the axle if you don’t have any metal
rod available you can make this work
just fine with a piece of wooden dowel
I’m using some scraps of leather for the
pouch on our sling if you don’t have
leather any strong cloth will work just
as well I have an eye bolt a couple of
nuts and a stack of washers that will
become the counterweight in our
trebuchet we have an assortment of nuts
and washers that will be used to help
space our throwing arm in between our
two support posts then we also have some
of these fruit candies and these are
going to be our projectiles we’ll also
use a tiny eye hook and a small brad
nail to attach our sling to our launch
arm the design for this trebuchet is
actually very basic and easy to make
from this board we’re going to cut four
pieces there will be a base a launch arm
and two side support pieces to be
cutting out the pieces I do have a
jigsaw and a circular saw if you don’t
have those most any kind of saw will
work but it might take a little longer
let’s start by measuring and cutting the
piece of board that we’ll use as the
base for our trebuchet now for reasons
that will become clear later let’s make
our board just over three and a quarter
inches wide I promise I have a good
reason for it being this width but it’s
a bit of a surprise
[Music]
with the base cut the next step is to
cut a one inch strip at least 16 inches
long my board is about two feet long so
I’ll cut my 1 inch strip 24 inches long
and then trim it down to 16 inches
[Music]
with our base in our launch arm cutout
we now need to cut out the two side
supports these are going to be two
triangle-shaped pieces that are tall
enough that at 10 and 1/2 inches we can
add the axle it’s not terribly important
that you match any particular shape with
these supports but it is good if it
extends to the left and right of the
axle a little bit to add support now all
of this will get removed and I’ll have
to sort of a shaped support pieces
[Music]
now with all four of our pieces cut to
the right size shape and sanded let’s
drill holes in the two supports and the
swing arm on the swing arm we want the
hole to go right through the center of
the board
about four inches from one end
[Music]
with our two support pieces and our
swing arm attached together with our
axle we now want to permanently attach
our support pieces to our base to make
sure we don’t crack our base board let’s
pre drill our holes before we add the
screws
[Music]
the basic construction shape of our
trebuchet is now assembled let’s trim
off the axle so it’s not sticking out
and good six inches out of the way our
throwing arm is now attached in between
the support posts but you can see that
it will easily slide from side to side
this is where we’ll use those nuts and
washers to help keep it centered right
in the middle we’ve got some nuts and
washers on our axle it still spins
beautifully but now it has no play to
either side as a next step let’s attach
a hook to the back of our throwing arm
that we can use to hang our weight from
now I’ve driven that i hook almost all
the way down the loop is now touching
the wood to be sure we have a way to
attach our weight now let’s use a small
pair of pliers and try our eye hook open
a little bit so it’s more of a hook and
less of an eye to make sure it’s open
far enough let’s see if our large eye
bolt can fit down into the gap looks
like it fits just great now to make our
weight let’s take our eye bolt load it
up with washers and add a few nuts on
the bottom to hold them all in place we
now have a nice weight try hanging that
on the end of our trebuchet and see what
happens if we let go well partly that’s
what we wanted to happen I guess we need
to close the hook over our loop once
it’s attached before I close that on
though I’m looking at the speed of this
and I think it would be better if we
could get it to launch just a little bit
faster than that that’s not a ton of
speed on there so I think I want to
increase this weight by a little bit
these are very small thin nails that are
designed to go in an electric nail gun
but I’m just gonna use them as a little
bit of weight today so I’m just going to
take several of them put them together
and tape them onto our weight that we’ve
already made
all right that is considerably heavier
almost double the weight that I had
before let’s see if our launch speed
seems to have changed at all that’s a
much better swing around I like that way
more
all right let’s attach our weight and
then close off our eye hook so they
can’t fall off on back and boom
beautiful launches and it doesn’t fall
off the two things we were looking for
now we need to add the sling that will
connect to the other end of the swing
arm
let’s use our string and the material
we’re using for our pouch to make the
sling before we attach it to the swing
arm
[Music]
when you’re choosing a string for your
trebuchet you want to find one that you
can’t easily break by pulling on it
[Music]
now for our trebuchet to launch the way
it should one inside of the string
should be permanently attached to the
swing arm and the other one should come
off as it’s swinging through the air so
let’s drill a small hole in the top of
our swing arm and tie one end of our
string to that and then we’ll make a
small ring and a little peg coming out
of the top to make sure that the other
string can release when it’s supposed to
positioning our sling we want the pouch
to be at the very end of our track and
then we’ll lower the swing arm down and
that’s where we know we need to attach
it let’s just make a mark in our string
for how long we want it to be while it’s
tied around the hole
[Music]
to make our hold and release mechanism
let’s add a small peg at the top of the
swing arm made from a very small nail
and a little ring on the end of the
other string now this nail does not have
much of a head but we want a smooth peg
with no head at all so let’s get a file
and take the head off of this so it’s
all smooth the head of our nail has now
been completely removed it’s really just
more of a smooth metal stick we now need
to drive this small Brad nail down into
the wood until there’s only about half
an inch maybe a centimeter of it
sticking out that looks like it should
work pretty well now let’s use a small
washer as the ring to attach to the
other side of the string
this will slip over the peg and should
release nicely when our sling is at the
top of its arc
[Music]
we can now see how our trebuchet loads
and will launch as the weight pulls it
down the pouch will swing up and around
the washer then we’ll slide off of the
post and it should take our projectile
and launch it through the air at this
point I think we need to do a test run I
have this small piece of candy which
I’ve sort of smushed into a little bit
more of a ball shape this will be our
projectile we’ll load that into the
pouch bring it all the way down and when
I release the pouch this should fire one
note about this before I fire it
currently the nail at the top of the
swing arm is pointed basically straight
up the angle of that nail has a lot to
do with at what point the washer will
slide off of it so it’s entirely
possible that right now with the angle
it’s at it might shoot too straight up
or even launch early let’s find out all
right
first test fire in three two one Wow
well it didn’t shoot straight up it shot
at just about a 45 degree angle which is
kind of what we want so it’s working
pretty well we just need a better launch
space guess let’s take this outside and
see how far it goes now we let this go
in three two one we oh wow I worked
pretty great 23 23 feet not bad let’s
see if we can do it again
firing in three two one whoo launched
one and a half 19 and a half last time
23 this time 19 and a half so it’s not
perfectly consistent but that’s still
pretty good wonder anyone firing a
full-size trebuchet back in the Dark
Ages ever said we as they launched it
they were missing out on a great
opportunity if they didn’t
working pretty good our trebuchet is
launching these candies a good distance
I think we’ve shown that the
counterweight on the trebuchet is
working pretty well but I also want to
try taking this up to another level I
want it to really launch these things
far and I have a thought for that all
right that was pretty cool this thing
has some pretty good distance on it but
there’s a little modification I want to
make I want to add some real power onto
this and I guess I could just keep
adding more weight I think there is a
limit I think it’s around 130 times the
weight of the projectile is how much
weight you should have on the back for
ideal launching but I want to see what
happens if we add spring power to it not
just a weight but something really
pulling on the string as hard as it can
to add a little bit more power to our
trebuchet we’re going to try using a
spring loaded rat trap this thing will
pull on our trebuchet arm with a ton of
power hopefully it doesn’t break it but
we should be able to get some incredible
distance and maybe some larger
projectiles using this
[Music]
now to make sure the rat trap is pulling
the string the right direction
when it fires our trebuchet let’s add a
small eye hook down at the bottom that
will help direct the string so it’s
pulling in the same direction as gravity
instead of pulling sort of sideways okay
I’ve got the eye bolt installed and I
offset it a little bit so it’s not quite
in the middle of the path this I’m
hoping will allow the firing mechanism
to still pass through a whole trebuchet
without getting caught on the eyeball as
it swings we can see now that with the
eye bolt in place no matter what angle I
pull this string at it’s always pulling
down on the back of the trebuchet arm
the same way I can pull it straight up
and it still pulls straight down so I
pull it out in the direction that the
rat trap will be we have a great angle
pulling the same direction as gravity so
I’m hoping this will work pretty well
[Music]
[Music]
all right here we go let’s take this
tape off load it properly and see if
it’ll fire all right now our trebuchet
is not loaded at the moment because I
think if we fire it indoors
we’ll just end up breaking stuff but
we’ll see if we can get it to fire even
though there’s no projectile in it now
to set it off I have some popsicle
sticks wrapped in some paper towel
wrapped in some tape and I’m doing this
because I don’t want to tape my fingers
but this is fairly soft and should be
able to activate the trap let’s see how
well this works hmm I snapped the string
it might be a little too powerful and
need some reinforcement we’ve got some
much thicker stronger string I’m gonna
try tying that in the same way attaching
it to both the trap and hook on the back
and hopefully this will be up to the
challenge our stronger string is now
attached to the trap and the hook on the
back let’s try launching it again and
see if we can get it to not break apart
this time there’s still no projectile in
it but it should work as a test here
goes Wow yeah yeah that launched very
quickly very powerfully I’d say that’ll
do it and we’re back outside our rat
trap is attached to the trebuchet the
string is attached to the swinging arm
and the trap is set so now let’s load up
some ammo and hit the trigger and see
what kind of distance we can get on this
bad boy all right here goes three two
one where’d it go did you see where it
went I didn’t even see well guess we’ll
just have to try again three two one
[Music]
I didn’t keep a better eye on it we had
two shots where we launched them out of
the trebuchet but we couldn’t really see
where they went they launched off so
quickly that we lost track of them and
even looking at the high-speed footage
of the camera we couldn’t really see
where they were going because they left
the frame pretty fast
so I actually had my cameraman stand
behind the trebuchet just to watch and
pay attention to where the shot was
going because we couldn’t find it
and we finally managed to track where
one launched after we launched it and I
was amazed at where it ended up how far
back is that thing there it is
there we go this is where it landed so
the trebuchet way over there and so it’s
possible that our first couple shots
went about as far as well and they just
have blended it into the grass so far
but I am amazed I’m amazed at how far
that went like I thought we’d get maybe
two or three times as far and well maybe
that is two or three times as far it
just seems like a lot if our first shot
was 20 feet then this is now I have to
measure it’s gonna take a while because
it’s a long ways but see how close one
almost 73 feet that’s pretty great 3 2 1
[Music]
this thing is working great with the
counterweight on it we get shots 20 to
25 feet away with the rat trap on it we
are getting shots up to 80 feet away
that’s pretty nuts this is certainly the
kind of project that deserves to be
scaled up something bigger and possibly
with projectiles that are on fire if you
wish that learning science we’re as
exciting as watching us demonstrate all
of these applications then you should
check out this quiz about various BMX
tricks this is from brilliant which
helps you get further into the world of
math and science and not just by
watching stuff but by doing stuff they
guide you through these concepts step by
step with straightforward explanations
and excellent graphics that makes it
very easy to digest by going to
brilliant dot-org / king of random you
can get started for free and by being
one of the first 567 people to upgrade
to the premium subscription you’ll get
20% off hey guys thanks for watching if
you’re not a subscriber yet just hit the
bomb to get in the club if you missed
our last video or want to watch it again
just click up here at the top click down
there if you want to see what the
internet thinks that you should watch
next that’s it for now have fun
be safe and see you tomorrow
[Music]
check the link in the description for a
discount on your first subscription hey
guys I’m Nate welcome back to the
workshop today we’re going to be
building a desktop version of a seized
weapon called a trebuchet this applies
to us a pretty basic I have here a 1/2
inch thick piece of plywood which is
about 2 feet by 2 feet and this will
actually be extra we’ll have some left
over after our build we’ve got some very
strong string this will be used in a
sling portion of our trebuchet I’ve got
a thin metal rod which are going to use
as the axle if you don’t have any metal
rod available you can make this work
just fine with a piece of wooden dowel
I’m using some scraps of leather for the
pouch on our sling if you don’t have
leather any strong cloth will work just
as well I have an eye bolt a couple of
nuts and a stack of washers that will
become the counterweight in our
trebuchet we have an assortment of nuts
and washers that will be used to help
space our throwing arm in between our
two support posts then we also have some
of these fruit candies and these are
going to be our projectiles we’ll also
use a tiny eye hook and a small brad
nail to attach our sling to our launch
arm the design for this trebuchet is
actually very basic and easy to make
from this board we’re going to cut four
pieces there will be a base a launch arm
and two side support pieces to be
cutting out the pieces I do have a
jigsaw and a circular saw if you don’t
have those most any kind of saw will
work but it might take a little longer
let’s start by measuring and cutting the
piece of board that we’ll use as the
base for our trebuchet now for reasons
that will become clear later let’s make
our board just over three and a quarter
inches wide I promise I have a good
reason for it being this width but it’s
a bit of a surprise
[Music]
with the base cut the next step is to
cut a one inch strip at least 16 inches
long my board is about two feet long so
I’ll cut my 1 inch strip 24 inches long
and then trim it down to 16 inches
[Music]
with our base in our launch arm cutout
we now need to cut out the two side
supports these are going to be two
triangle-shaped pieces that are tall
enough that at 10 and 1/2 inches we can
add the axle it’s not terribly important
that you match any particular shape with
these supports but it is good if it
extends to the left and right of the
axle a little bit to add support now all
of this will get removed and I’ll have
to sort of a shaped support pieces
[Music]
now with all four of our pieces cut to
the right size shape and sanded let’s
drill holes in the two supports and the
swing arm on the swing arm we want the
hole to go right through the center of
the board
about four inches from one end
[Music]
with our two support pieces and our
swing arm attached together with our
axle we now want to permanently attach
our support pieces to our base to make
sure we don’t crack our base board let’s
pre drill our holes before we add the
screws
[Music]
the basic construction shape of our
trebuchet is now assembled let’s trim
off the axle so it’s not sticking out
and good six inches out of the way our
throwing arm is now attached in between
the support posts but you can see that
it will easily slide from side to side
this is where we’ll use those nuts and
washers to help keep it centered right
in the middle we’ve got some nuts and
washers on our axle it still spins
beautifully but now it has no play to
either side as a next step let’s attach
a hook to the back of our throwing arm
that we can use to hang our weight from
now I’ve driven that i hook almost all
the way down the loop is now touching
the wood to be sure we have a way to
attach our weight now let’s use a small
pair of pliers and try our eye hook open
a little bit so it’s more of a hook and
less of an eye to make sure it’s open
far enough let’s see if our large eye
bolt can fit down into the gap looks
like it fits just great now to make our
weight let’s take our eye bolt load it
up with washers and add a few nuts on
the bottom to hold them all in place we
now have a nice weight try hanging that
on the end of our trebuchet and see what
happens if we let go well partly that’s
what we wanted to happen I guess we need
to close the hook over our loop once
it’s attached before I close that on
though I’m looking at the speed of this
and I think it would be better if we
could get it to launch just a little bit
faster than that that’s not a ton of
speed on there so I think I want to
increase this weight by a little bit
these are very small thin nails that are
designed to go in an electric nail gun
but I’m just gonna use them as a little
bit of weight today so I’m just going to
take several of them put them together
and tape them onto our weight that we’ve
already made
all right that is considerably heavier
almost double the weight that I had
before let’s see if our launch speed
seems to have changed at all that’s a
much better swing around I like that way
more
all right let’s attach our weight and
then close off our eye hook so they
can’t fall off on back and boom
beautiful launches and it doesn’t fall
off the two things we were looking for
now we need to add the sling that will
connect to the other end of the swing
arm
let’s use our string and the material
we’re using for our pouch to make the
sling before we attach it to the swing
arm
[Music]
when you’re choosing a string for your
trebuchet you want to find one that you
can’t easily break by pulling on it
[Music]
now for our trebuchet to launch the way
it should one inside of the string
should be permanently attached to the
swing arm and the other one should come
off as it’s swinging through the air so
let’s drill a small hole in the top of
our swing arm and tie one end of our
string to that and then we’ll make a
small ring and a little peg coming out
of the top to make sure that the other
string can release when it’s supposed to
positioning our sling we want the pouch
to be at the very end of our track and
then we’ll lower the swing arm down and
that’s where we know we need to attach
it let’s just make a mark in our string
for how long we want it to be while it’s
tied around the hole
[Music]
to make our hold and release mechanism
let’s add a small peg at the top of the
swing arm made from a very small nail
and a little ring on the end of the
other string now this nail does not have
much of a head but we want a smooth peg
with no head at all so let’s get a file
and take the head off of this so it’s
all smooth the head of our nail has now
been completely removed it’s really just
more of a smooth metal stick we now need
to drive this small Brad nail down into
the wood until there’s only about half
an inch maybe a centimeter of it
sticking out that looks like it should
work pretty well now let’s use a small
washer as the ring to attach to the
other side of the string
this will slip over the peg and should
release nicely when our sling is at the
top of its arc
[Music]
we can now see how our trebuchet loads
and will launch as the weight pulls it
down the pouch will swing up and around
the washer then we’ll slide off of the
post and it should take our projectile
and launch it through the air at this
point I think we need to do a test run I
have this small piece of candy which
I’ve sort of smushed into a little bit
more of a ball shape this will be our
projectile we’ll load that into the
pouch bring it all the way down and when
I release the pouch this should fire one
note about this before I fire it
currently the nail at the top of the
swing arm is pointed basically straight
up the angle of that nail has a lot to
do with at what point the washer will
slide off of it so it’s entirely
possible that right now with the angle
it’s at it might shoot too straight up
or even launch early let’s find out all
right
first test fire in three two one Wow
well it didn’t shoot straight up it shot
at just about a 45 degree angle which is
kind of what we want so it’s working
pretty well we just need a better launch
space guess let’s take this outside and
see how far it goes now we let this go
in three two one we oh wow I worked
pretty great 23 23 feet not bad let’s
see if we can do it again
firing in three two one whoo launched
one and a half 19 and a half last time
23 this time 19 and a half so it’s not
perfectly consistent but that’s still
pretty good wonder anyone firing a
full-size trebuchet back in the Dark
Ages ever said we as they launched it
they were missing out on a great
opportunity if they didn’t
working pretty good our trebuchet is
launching these candies a good distance
I think we’ve shown that the
counterweight on the trebuchet is
working pretty well but I also want to
try taking this up to another level I
want it to really launch these things
far and I have a thought for that all
right that was pretty cool this thing
has some pretty good distance on it but
there’s a little modification I want to
make I want to add some real power onto
this and I guess I could just keep
adding more weight I think there is a
limit I think it’s around 130 times the
weight of the projectile is how much
weight you should have on the back for
ideal launching but I want to see what
happens if we add spring power to it not
just a weight but something really
pulling on the string as hard as it can
to add a little bit more power to our
trebuchet we’re going to try using a
spring loaded rat trap this thing will
pull on our trebuchet arm with a ton of
power hopefully it doesn’t break it but
we should be able to get some incredible
distance and maybe some larger
projectiles using this
[Music]
now to make sure the rat trap is pulling
the string the right direction
when it fires our trebuchet let’s add a
small eye hook down at the bottom that
will help direct the string so it’s
pulling in the same direction as gravity
instead of pulling sort of sideways okay
I’ve got the eye bolt installed and I
offset it a little bit so it’s not quite
in the middle of the path this I’m
hoping will allow the firing mechanism
to still pass through a whole trebuchet
without getting caught on the eyeball as
it swings we can see now that with the
eye bolt in place no matter what angle I
pull this string at it’s always pulling
down on the back of the trebuchet arm
the same way I can pull it straight up
and it still pulls straight down so I
pull it out in the direction that the
rat trap will be we have a great angle
pulling the same direction as gravity so
I’m hoping this will work pretty well
[Music]
[Music]
all right here we go let’s take this
tape off load it properly and see if
it’ll fire all right now our trebuchet
is not loaded at the moment because I
think if we fire it indoors
we’ll just end up breaking stuff but
we’ll see if we can get it to fire even
though there’s no projectile in it now
to set it off I have some popsicle
sticks wrapped in some paper towel
wrapped in some tape and I’m doing this
because I don’t want to tape my fingers
but this is fairly soft and should be
able to activate the trap let’s see how
well this works hmm I snapped the string
it might be a little too powerful and
need some reinforcement we’ve got some
much thicker stronger string I’m gonna
try tying that in the same way attaching
it to both the trap and hook on the back
and hopefully this will be up to the
challenge our stronger string is now
attached to the trap and the hook on the
back let’s try launching it again and
see if we can get it to not break apart
this time there’s still no projectile in
it but it should work as a test here
goes Wow yeah yeah that launched very
quickly very powerfully I’d say that’ll
do it and we’re back outside our rat
trap is attached to the trebuchet the
string is attached to the swinging arm
and the trap is set so now let’s load up
some ammo and hit the trigger and see
what kind of distance we can get on this
bad boy all right here goes three two
one where’d it go did you see where it
went I didn’t even see well guess we’ll
just have to try again three two one
[Music]
I didn’t keep a better eye on it we had
two shots where we launched them out of
the trebuchet but we couldn’t really see
where they went they launched off so
quickly that we lost track of them and
even looking at the high-speed footage
of the camera we couldn’t really see
where they were going because they left
the frame pretty fast
so I actually had my cameraman stand
behind the trebuchet just to watch and
pay attention to where the shot was
going because we couldn’t find it
and we finally managed to track where
one launched after we launched it and I
was amazed at where it ended up how far
back is that thing there it is
there we go this is where it landed so
the trebuchet way over there and so it’s
possible that our first couple shots
went about as far as well and they just
have blended it into the grass so far
but I am amazed I’m amazed at how far
that went like I thought we’d get maybe
two or three times as far and well maybe
that is two or three times as far it
just seems like a lot if our first shot
was 20 feet then this is now I have to
measure it’s gonna take a while because
it’s a long ways but see how close one
almost 73 feet that’s pretty great 3 2 1
[Music]
this thing is working great with the
counterweight on it we get shots 20 to
25 feet away with the rat trap on it we
are getting shots up to 80 feet away
that’s pretty nuts this is certainly the
kind of project that deserves to be
scaled up something bigger and possibly
with projectiles that are on fire if you
wish that learning science we’re as
exciting as watching us demonstrate all
of these applications then you should
check out this quiz about various BMX
tricks this is from brilliant which
helps you get further into the world of
math and science and not just by
watching stuff but by doing stuff they
guide you through these concepts step by
step with straightforward explanations
and excellent graphics that makes it
very easy to digest by going to
brilliant dot-org / king of random you
can get started for free and by being
one of the first 567 people to upgrade
to the premium subscription you’ll get
20% off hey guys thanks for watching if
you’re not a subscriber yet just hit the
bomb to get in the club if you missed
our last video or want to watch it again
just click up here at the top click down
there if you want to see what the
internet thinks that you should watch
next that’s it for now have fun
be safe and see you tomorrow
[Music]
Please follow and like us: