
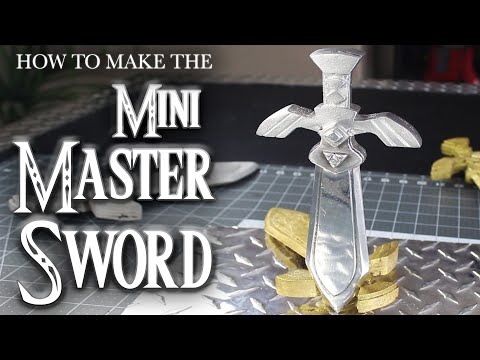
for this project I’m going to show you
how to forge a mini Master Sword out of
styrofoam make one just for fun and
cosplay or bury it in a bucket of sand
and turn it into solid metal however you
wield your power is completely up to you
because with this legendary sword you
are the master
let’s begin this project with another
sheet of dollar-store foam board and the
hot wire styro-slicer’ I showed you how
to build in a previous project you’ll
also need this mini master sword
template I drew in Photoshop and you can
have it for free if you just say thank
you and check the description for a link
now you probably remember the dollar
store foam board is just a layer of foam
sandwiched between two pieces of paper
and if we carefully use a fingernail to
pull up on one of the corners the paper
peels right off with hardly any trouble
at all
alright let’s get busy cutting out all
the individual pieces from the template
and if you want to save yourself from
having to glue them on and simply print
your templates on full-page label paper
instead cut all the shapes out as
cleanly and neatly as you can then go
find a glue stick so we can stick them
firmly onto the foam board next now when
you’re adding glue to the back of the
paper templates you don’t actually need
to smear the entire piece of paper
that’ll only make it trickier to get off
later on so just add a generous coating
around the edges instead then take time
to position the template carefully on
the foam board pressing the edges down
as smoothly as you can get them and if
you utilize a space by keeping the
pieces close together you’ll be able to
get three swords from one board if
everything looks smooth and secure then
go ahead and power up the styro-slicer’
the styro-slicer’ is a homemade hot wire
foam cutting factory that has adjustable
power settings for slicing styrofoam of
all shapes and sizes and can probably
create any custom cosplay or foam prop
you can think up all right the first
thing we need to do with this foam board
is chop the templates down into
manageable pieces
I typically slide the foam up and down
the wire a few times to rough out the
foam pieces a little faster then
carefully Tracy to the shapes once
they’re smaller and easier to work with
now the two base blades need some really
special attentions let’s focus on them
next tracing around the edges of just
the hilt and the handles first you can
see the hot wire slices easily through
the foam but doesn’t actually go through
the paper that’s really cool because it
leaves us with a really smooth and
professional-looking cut now hopefully
you didn’t cut the blade out yet because
there’s a cool little trick I’m going to
show you for doing that next move the
arm of the styro-slicer’ to the side of
the cutting base then slide the wire
back into the center of the work surface
and you’ll see you can adjust the angle
of the wire how cool is that
this means that now we can give our
blade a nice beveled edge so set the
wire around 45 degrees and double check
it’s pointing away from you then lay the
sword flat on the cutting base and trace
the blade
keep the wire is perpendicular to the
lines of the template as you can then
carefully trace the edges in four
separate passes when you made it around
to the other side of the hill then stop
and pull the sword straight back to warn
you to release the wire go ahead and
peel the styrofoam off from around the
edges and take a look at that cool
beveled blade and now that you got the
hang of it go ahead and do the other
sword the same way so we can move on to
modifying the thickness of the handle
next now for this next trick you’re
going to need to adjust the blade of the
styro-slicer’ so it hangs horizontally
over the cutting base and just like that
you’ve got the ability to cut foam bits
in half the blade can adjust to any
thickness you want but for simplicity
we’ll just be cutting a few select
pieces in half the only parts that
actually need to be downsized are the
two small blades and the two handle
grips which you can see leave us with
four of each but you can scrap the ones
with paper glued to them because we
won’t be needing them anymore
alright the pieces are all cut to shape
so let’s peel the paper templates off
the foam and if you’re careful not to
rip the paper you can actually use the
templates again to make another sword
now before going any further it’s a good
idea to lay out all the pieces on a
table to make sure they’re all there you
should have 28 pieces altogether and if
you do then let’s get busy gluing them
together there’s a little diagram on the
template that shows how the finished
sword is going to look so start
assembling it by laying one of the base
blades flat on the table and gluing the
hilt to the top take a little time to
adjust the bottom and the sides they
match up with the base plate on the
bottom then simply follow the pattern
for the rest of the pieces and you
should end up with two completed sides
of the sword that look identical now
simply add a generous amount of glue to
the flat sides on the bottom then gently
but firmly seal them together that’s
pretty much it all that’s left for
finishing our Master Sword now is
carving out the Triforce use a pair of
scissors or an x-acto knife to carefully
draw the three lines to form a triangle
in the middle then carve the little
channels as deep as you like with that
final step your 3d foam sword is
finished and of course you can get
creative and customize it any way you
want I gently sanded the sword with a
220 grit sanding sponge to smooth down
any imperfections making our little
homemade creation look surprisingly
professional now before you get too
crazy with your sword it’s a good idea
to leave it overnight so the glue has a
chance to dry completely and if you plan
on turning your sword and aluminum
you’re going to need a foam riser like
this as well so you might as well make
one of those while you’re waiting simply
cut the riser to whatever length you
need then bury the sword in a bucket of
sand and pour hot molten aluminum over
top you’ll see the styrofoam vaporizes
instantly from the extreme temperature
allowing a metal to flow in and take its
place before the sand even has a chance
to collapse after 5 to 10 minutes of
cooling the metal will still be scalding
hot but should be hard enough for you to
grip on to with a pair of pliers or
channel locks you can unearth the sword
from the sand now the finer of the sand
you use the more detail will be captured
in your casting and if you’re happy with
how it looks just dip the whole thing in
a bucket of water to cool it then clean
it up a bit to finish it off these
swords will take some time and some
skill to make but they’re so low-cost
that you can make a whole arsenal of
foam weaponry for just a couple of bucks
in a bit of your time well now you know
how to use a little electricity and some
dollar-store foam board to forge a
powerful and impressive mini Master
Sword by the way if you try
experimenting with different kinds of
metals you’ll probably find you can cast
a sword from just about anything you
want i melted a few handfuls of bullet
casings and turn them into a golden
sword it’s over three times heavier than
aluminum but it makes a really cool
addition to my metal casting collection
well that’s it for now if you liked this
project perhaps you’ll like some of my
others check them out at the king of
random calm hey guys i’m sharing the
love today with my good friend colin
furze who’s probably the Internet’s most
amazing mad inventor and he’s doing so
many amazing things right now on his
youtube channel
I found Colin’s channel over a year and
a half ago when he built a wrist mounted
pyro torch that shoots flames over 12
feet long I’ve been amazed by all those
crazy inspiring ideas ever since this is
a man driven by passion and adrenaline
with no regard for health or safety
which is one of the reasons I really
like them Colin’s made some pretty epic
projects you might have already come
across like a retractable hidden blade
from the Assassin’s Creed video games
and a fully functional set of Wolverine
claws if you haven’t seen those videos
yet then check them out down here he’s
also made magneto shoes an ice bike and
even remote-controlled trashcan how
funny of that Colin’s an ex plumber with
no engineering qualifications at all and
is constantly pushing himself and the
boundaries of sanity to bring you
high-quality entertainment so go check
him out he’s a real out-of-the-box
thinker and he can make
anything and if Collins sent you here
from his channel then welcome aboard
I’ve made a playlist of projects I think
you might like and stuck them right here
thanks again and I’ll see you in the
next project video I’ll talk to you then
how to forge a mini Master Sword out of
styrofoam make one just for fun and
cosplay or bury it in a bucket of sand
and turn it into solid metal however you
wield your power is completely up to you
because with this legendary sword you
are the master
let’s begin this project with another
sheet of dollar-store foam board and the
hot wire styro-slicer’ I showed you how
to build in a previous project you’ll
also need this mini master sword
template I drew in Photoshop and you can
have it for free if you just say thank
you and check the description for a link
now you probably remember the dollar
store foam board is just a layer of foam
sandwiched between two pieces of paper
and if we carefully use a fingernail to
pull up on one of the corners the paper
peels right off with hardly any trouble
at all
alright let’s get busy cutting out all
the individual pieces from the template
and if you want to save yourself from
having to glue them on and simply print
your templates on full-page label paper
instead cut all the shapes out as
cleanly and neatly as you can then go
find a glue stick so we can stick them
firmly onto the foam board next now when
you’re adding glue to the back of the
paper templates you don’t actually need
to smear the entire piece of paper
that’ll only make it trickier to get off
later on so just add a generous coating
around the edges instead then take time
to position the template carefully on
the foam board pressing the edges down
as smoothly as you can get them and if
you utilize a space by keeping the
pieces close together you’ll be able to
get three swords from one board if
everything looks smooth and secure then
go ahead and power up the styro-slicer’
the styro-slicer’ is a homemade hot wire
foam cutting factory that has adjustable
power settings for slicing styrofoam of
all shapes and sizes and can probably
create any custom cosplay or foam prop
you can think up all right the first
thing we need to do with this foam board
is chop the templates down into
manageable pieces
I typically slide the foam up and down
the wire a few times to rough out the
foam pieces a little faster then
carefully Tracy to the shapes once
they’re smaller and easier to work with
now the two base blades need some really
special attentions let’s focus on them
next tracing around the edges of just
the hilt and the handles first you can
see the hot wire slices easily through
the foam but doesn’t actually go through
the paper that’s really cool because it
leaves us with a really smooth and
professional-looking cut now hopefully
you didn’t cut the blade out yet because
there’s a cool little trick I’m going to
show you for doing that next move the
arm of the styro-slicer’ to the side of
the cutting base then slide the wire
back into the center of the work surface
and you’ll see you can adjust the angle
of the wire how cool is that
this means that now we can give our
blade a nice beveled edge so set the
wire around 45 degrees and double check
it’s pointing away from you then lay the
sword flat on the cutting base and trace
the blade
keep the wire is perpendicular to the
lines of the template as you can then
carefully trace the edges in four
separate passes when you made it around
to the other side of the hill then stop
and pull the sword straight back to warn
you to release the wire go ahead and
peel the styrofoam off from around the
edges and take a look at that cool
beveled blade and now that you got the
hang of it go ahead and do the other
sword the same way so we can move on to
modifying the thickness of the handle
next now for this next trick you’re
going to need to adjust the blade of the
styro-slicer’ so it hangs horizontally
over the cutting base and just like that
you’ve got the ability to cut foam bits
in half the blade can adjust to any
thickness you want but for simplicity
we’ll just be cutting a few select
pieces in half the only parts that
actually need to be downsized are the
two small blades and the two handle
grips which you can see leave us with
four of each but you can scrap the ones
with paper glued to them because we
won’t be needing them anymore
alright the pieces are all cut to shape
so let’s peel the paper templates off
the foam and if you’re careful not to
rip the paper you can actually use the
templates again to make another sword
now before going any further it’s a good
idea to lay out all the pieces on a
table to make sure they’re all there you
should have 28 pieces altogether and if
you do then let’s get busy gluing them
together there’s a little diagram on the
template that shows how the finished
sword is going to look so start
assembling it by laying one of the base
blades flat on the table and gluing the
hilt to the top take a little time to
adjust the bottom and the sides they
match up with the base plate on the
bottom then simply follow the pattern
for the rest of the pieces and you
should end up with two completed sides
of the sword that look identical now
simply add a generous amount of glue to
the flat sides on the bottom then gently
but firmly seal them together that’s
pretty much it all that’s left for
finishing our Master Sword now is
carving out the Triforce use a pair of
scissors or an x-acto knife to carefully
draw the three lines to form a triangle
in the middle then carve the little
channels as deep as you like with that
final step your 3d foam sword is
finished and of course you can get
creative and customize it any way you
want I gently sanded the sword with a
220 grit sanding sponge to smooth down
any imperfections making our little
homemade creation look surprisingly
professional now before you get too
crazy with your sword it’s a good idea
to leave it overnight so the glue has a
chance to dry completely and if you plan
on turning your sword and aluminum
you’re going to need a foam riser like
this as well so you might as well make
one of those while you’re waiting simply
cut the riser to whatever length you
need then bury the sword in a bucket of
sand and pour hot molten aluminum over
top you’ll see the styrofoam vaporizes
instantly from the extreme temperature
allowing a metal to flow in and take its
place before the sand even has a chance
to collapse after 5 to 10 minutes of
cooling the metal will still be scalding
hot but should be hard enough for you to
grip on to with a pair of pliers or
channel locks you can unearth the sword
from the sand now the finer of the sand
you use the more detail will be captured
in your casting and if you’re happy with
how it looks just dip the whole thing in
a bucket of water to cool it then clean
it up a bit to finish it off these
swords will take some time and some
skill to make but they’re so low-cost
that you can make a whole arsenal of
foam weaponry for just a couple of bucks
in a bit of your time well now you know
how to use a little electricity and some
dollar-store foam board to forge a
powerful and impressive mini Master
Sword by the way if you try
experimenting with different kinds of
metals you’ll probably find you can cast
a sword from just about anything you
want i melted a few handfuls of bullet
casings and turn them into a golden
sword it’s over three times heavier than
aluminum but it makes a really cool
addition to my metal casting collection
well that’s it for now if you liked this
project perhaps you’ll like some of my
others check them out at the king of
random calm hey guys i’m sharing the
love today with my good friend colin
furze who’s probably the Internet’s most
amazing mad inventor and he’s doing so
many amazing things right now on his
youtube channel
I found Colin’s channel over a year and
a half ago when he built a wrist mounted
pyro torch that shoots flames over 12
feet long I’ve been amazed by all those
crazy inspiring ideas ever since this is
a man driven by passion and adrenaline
with no regard for health or safety
which is one of the reasons I really
like them Colin’s made some pretty epic
projects you might have already come
across like a retractable hidden blade
from the Assassin’s Creed video games
and a fully functional set of Wolverine
claws if you haven’t seen those videos
yet then check them out down here he’s
also made magneto shoes an ice bike and
even remote-controlled trashcan how
funny of that Colin’s an ex plumber with
no engineering qualifications at all and
is constantly pushing himself and the
boundaries of sanity to bring you
high-quality entertainment so go check
him out he’s a real out-of-the-box
thinker and he can make
anything and if Collins sent you here
from his channel then welcome aboard
I’ve made a playlist of projects I think
you might like and stuck them right here
thanks again and I’ll see you in the
next project video I’ll talk to you then
Please follow and like us: