
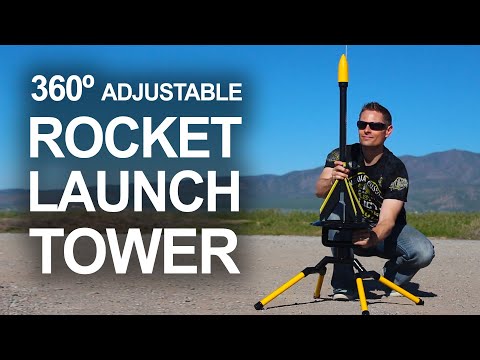
for this project I’m going to show you
how to build a custom rocket launching
blast pad you’ll find these don’t cost
much to make but they’re still
impressively durable portable and will
launch a rocket any angle you point it
let’s start this project with some
common sprinkler parts these are 3/4
inch PVC fittings and you should be able
to find them all at your nearest
hardware store will also need a quarter
inch by one and a half inch fender
washer and some quarter inch by one and
a half inch hex head lag screws in
reality you’ll only need one but it’s
good to have a couple spares on hand
just in case you want them now the body
of our launchpad is made with 3/4 inch
PVC tubing and you’ll need four pieces
that are 12 inches long these other 15
pieces are exactly 2 inches each and I
cut mine from the leftover tubing so
that didn’t cost anything extra 2 inch
tubes work really well for prototyping
because as you can see they’ll join any
three-quarter inch fittings together in
an instant okay let’s go ahead and dry
fit all the pieces together just to
double-check we have all the pieces we
need at all the right measurements when
everything is assembled the body of your
launchpad should look something like
this
gluing any pieces together is completely
optional and in all honesty you don’t
really need to but just because we can
I’m going to use a little PVC glue to
make a few parts on mine a little more
permanent I chose to glue the launchpad
together in five separate segments like
you see here because this way it’ll
easily come apart so we can store it
later when it’s not being used now
before we apply any glue it’s really
important to make sure all the
components are flat and aligned properly
the easiest way to do that is by
pressing them down on the table when
you’re confident you can keep them
straight go ahead and glue the
components together in the usual way by
following the directions on your can of
PVC glue and it’s a really good idea to
have some kind of paper or drop cloth
covering your table because this
chemical glue is nasty stuff and can eat
the finish right off your work surface
within seconds give the connections
about five minutes to cure then go ahead
and fit the five segments back together
to see how they look hopefully you got
it right on the first try because at
this point there’s no going back now
check out what we can do at the top push
the head forward then pull it all the
way back and swivel it around 360
degrees
if it does that then congratulations
your swivel head is working and you’re
ready for a blast pad I went to a local
thrift store and picked up a variety of
different pot lids and serving plates
for around 50 cents each so I’m
confident you can find something similar
for
a dollar or less pot lids are an awesome
choice because when the handles remove
you can see there’s already a hole
drilled exactly in the center but for
mine I’m going with this serving tray
instead because I like the contour and
look of it better especially when it’s
flipped upside down now the blast pad
needs a hole drilled in the center of
the plate so eyeball it as best you can
then drill a hole 3/16 of an inch wide
we need to drill the same kind of hole
through the top of the PVC cross as well
right in the center because this is
where the blast pad is going to get
connected and before going any further
let’s just make sure this plate is
actually going to work by setting the
blast pad in position and securing it to
the PVC assembly with one of the lag
screws the threads of the screw should
bite tightly into the PVC sucking the
plate down against the plastic cross
snugly enough that won’t move but if for
some reason you end up stripping the
screw holes or just want it even more
secure you can still add another screw
on either side by securing them into the
cross beam below now that we know the
lid fits it’s a really good idea to add
a 1 and a half inch fender washer to the
center of the blast pad because it’s
made of steel and will help dissipate
the heat most pot lids are made of
aluminum and there’s a chance the blast
more rocket motor will burn a hole right
through it but a fender washer on the
top will block the heat and solve the
problem before it starts with the screw
and washer in place mark a dot one and a
half inches from the center and in line
with one of the arms of the PVC cross
underneath this hole will be for the
launch rod and before you drill it take
a good look at it from the side to make
sure everything is in line and centered
you’ll need to go all the way through
the top and just a tiny bit into the
bottom but be very careful you don’t go
all the way through if you did it right
you’ll be able to push a stick or a rod
through the hole and position it into
the groove at the bottom effectively
locking in place the rod I’m using is a
3/16 inch by four foot steel rod found
in the hardware aisle of the hardware
store as well alright the time has come
to customize our launch pad with a paint
job and for that I’m using black and
yellow paint to match the randomizer
rocket that I’ll show you how to build
in another project video three coats of
paint and 24 hours later the launch pad
is looking pretty awesome and at this
point our blast pad is completely
finished and ready for use setting up is
as simple as inserting the guide rod and
dropping a rocket into position here you
can see the nozzle the rocket lines up
perfectly with the fender washer and if
that ever gets damaged for some reason
it’s super cheap and easy to replace
alright to test it out I took my system
to a launch site and dropped one of my
randomizer rockets into position
you can see with this design the rocket
easily cycles through a multitude of
different angles and can rotate a full
360 degrees as well that’s awesome the
rail will even drop down to a flight
angle of zero degrees and I’m not sure
why you’d ever need to use that feature
but I’m just saying you could I loaded
my rocket with an SD z96 black-powder
rocket motor which you can see screws in
at the bottom and even blasting off with
that much power you’ll notice the lodge
pad didn’t even flinch
your new launch pad should be durable
enough to last indefinitely withstand a
lifetime of rocket launches and when
you’re not out launching rockets it’ll
come apart in seconds for easy storage
or transportation well now you know how
to transform thrift shop pot lids and
PVC sprinkler parts into a custom rocket
launching blast pad that doesn’t cost
much to build but I’ll still be just as
durable and effective as anything you
buy it twice the price by the way it’ll
also be a nice complement to your
homemade randomizer rocket so if you
want to make one of those look for the
project video on how I built mine well
that’s it for now if you liked this
project perhaps you’ll like some my
others check them out at the king of
random comm hey guys this project was
part of a design collaboration I did
with my friends at Sonic dad calm please
check them out and subscribe to their
YouTube channel if you remember the
collaboration we did last year with the
assassins micro crossbow then you’ll
understand why I chose Richie from the
sonic dad team as my partner for
building a rocket he’s a creative genius
in all respects and has an amazing mind
for thinking outside the box together
Richie and I designed a really cool
launch pad the randomizer rocket and a
recovery parachute that all work
impressively well we’ve done around 50
launches so far and he’s already got
detailed videos and instructions on how
to make them at Sonic dad comm I highly
recommend you support and subscribe to
Sonic dad because they’re one of the
channels I follow and these guys have my
highest respect I know them personally
and they’re on a mission to help people
turn off the TV and go make something
cool instead thank you for watching and
supporting these projects I appreciate
you and I’m excited to see you around
for the next project video I’ll talk to
you then
how to build a custom rocket launching
blast pad you’ll find these don’t cost
much to make but they’re still
impressively durable portable and will
launch a rocket any angle you point it
let’s start this project with some
common sprinkler parts these are 3/4
inch PVC fittings and you should be able
to find them all at your nearest
hardware store will also need a quarter
inch by one and a half inch fender
washer and some quarter inch by one and
a half inch hex head lag screws in
reality you’ll only need one but it’s
good to have a couple spares on hand
just in case you want them now the body
of our launchpad is made with 3/4 inch
PVC tubing and you’ll need four pieces
that are 12 inches long these other 15
pieces are exactly 2 inches each and I
cut mine from the leftover tubing so
that didn’t cost anything extra 2 inch
tubes work really well for prototyping
because as you can see they’ll join any
three-quarter inch fittings together in
an instant okay let’s go ahead and dry
fit all the pieces together just to
double-check we have all the pieces we
need at all the right measurements when
everything is assembled the body of your
launchpad should look something like
this
gluing any pieces together is completely
optional and in all honesty you don’t
really need to but just because we can
I’m going to use a little PVC glue to
make a few parts on mine a little more
permanent I chose to glue the launchpad
together in five separate segments like
you see here because this way it’ll
easily come apart so we can store it
later when it’s not being used now
before we apply any glue it’s really
important to make sure all the
components are flat and aligned properly
the easiest way to do that is by
pressing them down on the table when
you’re confident you can keep them
straight go ahead and glue the
components together in the usual way by
following the directions on your can of
PVC glue and it’s a really good idea to
have some kind of paper or drop cloth
covering your table because this
chemical glue is nasty stuff and can eat
the finish right off your work surface
within seconds give the connections
about five minutes to cure then go ahead
and fit the five segments back together
to see how they look hopefully you got
it right on the first try because at
this point there’s no going back now
check out what we can do at the top push
the head forward then pull it all the
way back and swivel it around 360
degrees
if it does that then congratulations
your swivel head is working and you’re
ready for a blast pad I went to a local
thrift store and picked up a variety of
different pot lids and serving plates
for around 50 cents each so I’m
confident you can find something similar
for
a dollar or less pot lids are an awesome
choice because when the handles remove
you can see there’s already a hole
drilled exactly in the center but for
mine I’m going with this serving tray
instead because I like the contour and
look of it better especially when it’s
flipped upside down now the blast pad
needs a hole drilled in the center of
the plate so eyeball it as best you can
then drill a hole 3/16 of an inch wide
we need to drill the same kind of hole
through the top of the PVC cross as well
right in the center because this is
where the blast pad is going to get
connected and before going any further
let’s just make sure this plate is
actually going to work by setting the
blast pad in position and securing it to
the PVC assembly with one of the lag
screws the threads of the screw should
bite tightly into the PVC sucking the
plate down against the plastic cross
snugly enough that won’t move but if for
some reason you end up stripping the
screw holes or just want it even more
secure you can still add another screw
on either side by securing them into the
cross beam below now that we know the
lid fits it’s a really good idea to add
a 1 and a half inch fender washer to the
center of the blast pad because it’s
made of steel and will help dissipate
the heat most pot lids are made of
aluminum and there’s a chance the blast
more rocket motor will burn a hole right
through it but a fender washer on the
top will block the heat and solve the
problem before it starts with the screw
and washer in place mark a dot one and a
half inches from the center and in line
with one of the arms of the PVC cross
underneath this hole will be for the
launch rod and before you drill it take
a good look at it from the side to make
sure everything is in line and centered
you’ll need to go all the way through
the top and just a tiny bit into the
bottom but be very careful you don’t go
all the way through if you did it right
you’ll be able to push a stick or a rod
through the hole and position it into
the groove at the bottom effectively
locking in place the rod I’m using is a
3/16 inch by four foot steel rod found
in the hardware aisle of the hardware
store as well alright the time has come
to customize our launch pad with a paint
job and for that I’m using black and
yellow paint to match the randomizer
rocket that I’ll show you how to build
in another project video three coats of
paint and 24 hours later the launch pad
is looking pretty awesome and at this
point our blast pad is completely
finished and ready for use setting up is
as simple as inserting the guide rod and
dropping a rocket into position here you
can see the nozzle the rocket lines up
perfectly with the fender washer and if
that ever gets damaged for some reason
it’s super cheap and easy to replace
alright to test it out I took my system
to a launch site and dropped one of my
randomizer rockets into position
you can see with this design the rocket
easily cycles through a multitude of
different angles and can rotate a full
360 degrees as well that’s awesome the
rail will even drop down to a flight
angle of zero degrees and I’m not sure
why you’d ever need to use that feature
but I’m just saying you could I loaded
my rocket with an SD z96 black-powder
rocket motor which you can see screws in
at the bottom and even blasting off with
that much power you’ll notice the lodge
pad didn’t even flinch
your new launch pad should be durable
enough to last indefinitely withstand a
lifetime of rocket launches and when
you’re not out launching rockets it’ll
come apart in seconds for easy storage
or transportation well now you know how
to transform thrift shop pot lids and
PVC sprinkler parts into a custom rocket
launching blast pad that doesn’t cost
much to build but I’ll still be just as
durable and effective as anything you
buy it twice the price by the way it’ll
also be a nice complement to your
homemade randomizer rocket so if you
want to make one of those look for the
project video on how I built mine well
that’s it for now if you liked this
project perhaps you’ll like some my
others check them out at the king of
random comm hey guys this project was
part of a design collaboration I did
with my friends at Sonic dad calm please
check them out and subscribe to their
YouTube channel if you remember the
collaboration we did last year with the
assassins micro crossbow then you’ll
understand why I chose Richie from the
sonic dad team as my partner for
building a rocket he’s a creative genius
in all respects and has an amazing mind
for thinking outside the box together
Richie and I designed a really cool
launch pad the randomizer rocket and a
recovery parachute that all work
impressively well we’ve done around 50
launches so far and he’s already got
detailed videos and instructions on how
to make them at Sonic dad comm I highly
recommend you support and subscribe to
Sonic dad because they’re one of the
channels I follow and these guys have my
highest respect I know them personally
and they’re on a mission to help people
turn off the TV and go make something
cool instead thank you for watching and
supporting these projects I appreciate
you and I’m excited to see you around
for the next project video I’ll talk to
you then
Please follow and like us: