
hey guys I’m Nate welcome back to the
workshop in the past we’ve done some fun
experiments with candy and today I have
a new one I want to try I want to see if
we can make some glowing candy that’s
right
candy that actually Luminess is in all
of my research I wasn’t able to find any
foods that actually put off light on
their own so I’m going with the next
best thing and I’m going to see if I can
make candy that glows under a blacklight
edible substances that glow under a
blacklight are also fairly uncommon and
actually I was only able to find two one
of them is quinine which has a
horrendously bitter and overpowering
taste so I didn’t want to use that the
other thing I found is vitamin b2 also
known as riboflavin a little bit of
reading tells me that riboflavin is
non-toxic even at fairly high doses
which we aren’t even going to use in
this recipe so I’m going to see if we
can use this vitamin to give some bright
backlight glow to our candy I figured if
we’re going to have some candy that
glows under a blacklight we might as
well pick something that looks like it
should glow so the goal today is to see
if we can make some glowing green candy
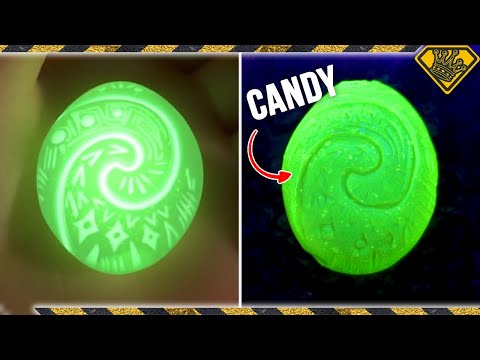
that looks like the heart of taffy tea
stone from the movie Moana the first
step will be to make a heart of taffy T
stone that we can then mold to cast our
candy in to make our stone I have this
yellow sculpey brand polymer clay which
you bake in the oven to make it hard and
I also have this same two-part silicone
mold rubber that we use to make our
thumb molds unfortunately I don’t have a
lot of tips on how to sculpt something
to look how you want except to look up
pictures of what you want it to look
like and then squish it until it’s in
the right shape the stone in the movie
is not quite as wide as a person’s palm
so I’m going to try and make it one and
a half maybe two inches tall
I think this seems like about a good
amount of clay if I start forming it and
it’s too big or too small I can add a
little bit more or take some off squish
it around a little bit to get it kind of
soft roll it into a sort of a ball not
like a really good ball but kind of
around
that’s sort of round now let’s flatten
that out a little bit and I want a
tapered edge going around rounded edge
nothing sharp all right I think that is
a pretty good approximation of the size
and shape of the stone we can see it’s
not quite as wide as my whole palm but
it’s still got some good sides to it so
now it’s time to start carving in the
decorations on the front of the stone
lightly marking in where all my lines to
go all right there we go we have our
nice carved out heart of to Fiji I’ve
tried to match the patterns on it to the
movie as well as I could
it’s probably not a hundred percent but
it’s pretty good I think now we need to
bake this in the oven at 275 Fahrenheit
or 130 Celsius for 15 to 20 minutes
[Music]
all right I think our clay is ready to
take out of the oven let’s see how it’s
looking you really use tools not your
hands to pull it out but foil is so thin
it doesn’t conduct all that much heat
let’s let that cool down for a minute
okay I think our stone is now cooled
down pretty well it’s looking good now
just to get rid of any of the little
scuffs or burrs I left on the surface I
want to hit this with some sandpaper to
really smooth it down now it’s not very
rough and doesn’t need a lot of changes
so I’m gonna hit it with some 800 grit
sandpaper which is fairly fine and then
some 2,000 grit sandpaper which is
actually very smooth I’m hoping for a
little bit of a shiny look on it did get
a little bit of cracking along the back
as it baked but pretty minor it’s on the
back I’m not worried about it of course
I don’t want to sand so much that I lose
any of the details I carved in but it’s
a pretty fine grit sandpaper so I’m not
very worried all right that’s with the
800 let’s move on to our mm mm grit
sandpaper it doesn’t even really feel
like sandpaper just kind of feels like
normal paper honestly but it does make a
difference there we go
I think our heart if to fede stone is
now complete and I think it’s looking
really good
so let’s use our two-part silicon mold
rubber and make a mold on this stone now
to make sure that we are able to pour
our candy into our mold I have a little
bit of this modeling clay that I’m going
to attach to our heart of two PD stone
to make a pour spout so that it’s not
just completely closed up once the whole
thing is covered in silicone there will
be an opening where this bit of clay is
that’s where we’ll be able to pour in
the candy so now we’ve got our two-part
silicone it’s just two putties that look
kind of like silly putty really a couple
of blobs there’s a blob of purple a blob
of white those look about the same size
maybe just a smidgen more white
now we need to squish those all together
let’s just knead this until it’s all one
uniform color with no more streaks in it
there we go that looks like one smooth
texture
no more streaking no more marbling let’s
apply it to our stone smooshing it down
because I want a nice smooth flat
surface that I can press in to really
pick up all of the details of our little
part of taffy tea here if you recall
this stuff can actually do really good
detail on the thumb suckers we were able
to pick up Grant and my fingerprints in
the thumbs so I’m hoping that the level
of detail in the stone will be no
problem for it alright it’s nice and
enveloped and I’m just gonna stick that
down onto the counter and give it a nice
flat spot hopefully that will make it so
that we’re trying to pour candy into it
it will hold itself up nicely I’ve also
added a little bit of a thicker Ridge on
this side that’s where we’ll cut in the
mold open to be able to pull out our
heart of taffy D stone master and the
candy once we’ve cast it in there our
silicone mold should only take 15 or 20
minutes to cure before we can take out
the yellow heart of taffy D stone inside
it and while it’s doing that we’re gonna
get started making our candy as I
explained we want to use some of the
coloring in the b2 vitamins in our candy
to make it so it will glow under a
blacklight
so let’s take out a few of these tablets
and grind them up into a powder that
will hopefully dissolve into some water
you can see these are pretty bright
yellow colored although they don’t look
like they’re anything really spectacular
it’s just sort of yellow tablets I’m
going to start with just two of them and
see how much powder we get out of that
two of these tablets into our mortar
starts pushing it up pestle
I think this one’s the mortar this is
the pestle but maybe I have that
backwards that grinds up into a powder
very quickly our candy recipe calls for
3/4 cups of water so that’s how much I
have in this little pot here I’m going
to now pour our powder into our pot now
let’s do a test with our backlight to
see how much this water and riboflavin
mixture will glow whew we’ll give that
without the backlight with the black
light that lights up beautifully it’s
such a good bright color I’m excited you
can see everywhere that’s flashed onto
the counter so we’ve got our mixture and
that’s blowing really well but it has a
lot of this thick yellow powder down in
it and I really just want the water to
be glowing on its own so let’s see if we
can filter out all of the yellow powder
so we’re just left with the dyed water
we’ve got a coffee filter here and a
mason jar without the covering part of
the lid I have the ring so let’s just
stuff the coffee filter down in most of
the way hold it over the lip and screw
the ring over the coffee filter this way
it’ll hold all the liquid and I don’t
have to try and hold the filter on with
one hand while I’m pouring it’s just
better alright here goes
[Music]
it’s so bright that looks like just
straight highlighter ink straight out of
the world of Avatar or something just
like straining out concentrated magic
now we have some essence of b2 vitamin
and it glows beautifully in a black
light let’s use this to make our candy
one thing I did talk about how I didn’t
want to use quinine because it’s
extremely bitter riboflavin doesn’t
taste all that great either but I’m
hoping that diluted like this and mixed
in with all of the sugar in the candy
it’ll be pretty good and just as a small
test I’m gonna take a sip of this and
see how it is
it’s not great it does have a little bit
of a bitter taste to it and a little bit
like dirt I guess but it’s pretty mild I
think it’s a flavor that could easily be
masked by all the sugar and the
flavorings we’re going to add to our
candy we’ll see once we’re finished our
candy recipe if you don’t remember is
two cups of sugar 2/3 cups of corn syrup
and 3/4 cups of water
[Music]
and as our water we have our neon glow
ejuice now let’s throw this on the stove
and stir it until all of the sugar is
dissolved there we go I think the sugar
at this point is just about dissolved so
let’s put in the candy thermometer and
let it go 260 degrees Fahrenheit it’s
time to add some food coloring I’m just
gonna add a little bit of green to try
and match the color of the movie we
don’t need to stir the color in the
bubbling action will do that for us
right at 300 remove from the heat we’re
going with a nice lemon flavor today
lime maybe would have matched the color
better but lime flavoring is a lot
harder to find
while the candy is cooking on the stove
let’s de mold our heart of two fede
stone and see how it turned out pop this
clay right off take a razor and we’ll
carefully cut along the edge of it pull
that out it’s looking pretty good in
there see quite a bit of our carved in
details I like that let’s actually just
use a little bit of electrical tape
wrapped around this to hold it closed
[Music]
now I’m quite sure if I try and pick up
the whole pot and pour it into that
little spot I’m just gonna spill
everywhere so I’m gonna try scooping up
some candy in this spoon and drizzly get
in a little bit slower that looks like a
spoonful of Ninja Turtle use and I’m
still spilling it all over so imagine
how much worse it would be if I use the
whole pot I think that is full okay our
mold has cooled down I think so it’s
time to see how our candy part of defeat
II has turned out take off this tape
little shards of candy that dribbled on
the outside come on more shards so far
looking good
oh yeah beautiful I’m just gonna break
off a little pour spout stuff on top but
that has some pretty good details in it
it’s not perfect but you can tell what
that is that looks a lot like the one in
the movie that is really cool now it
does have a little bit of a frost and
texture that we often get from the candy
so I am gonna try hitting with some heat
I’ll start on the back and see if it’s
working there I’m just gonna use our
little wind resistant lighter here see
if I can clear it up just a little bit
yes just like that
beautiful
now I actually went ahead and made two
other molds as well so that I could
produce multiple of these parts of taffy
T at once so let’s see how these ones
turned out beautiful three parts of
taffy T one of which is a lollipop
that’s pretty excellent it’s gonna taste
some of these little scraps here I’m
really good I can’t take any of the
bitterness from the riboflavin
I’m just getting sugar and lemon that’s
really good well there’s one more very
important test and that’s to see how
well these hearts glow in blacklight I’m
excited I think they’re gonna glow
really well all right here goes we’ve
got our backlight we’ve got our heart ah
all that looks amazing look at that
glowing Oh even better
glowing green part of test easy stone
[Music]
there we go our heart of two fede candy
glowing under backlight stones turned
out just the way I was hoping they would
they’re translucent but not a hundred
percent clear like the ones in the movie
they’re made of candy not like the ones
in the movie and they glow under a
blacklight which is just it looks so
cool the b2 vitamin tablets that we use
to get the color and the glowing effect
did not affect the taste negatively
you really can’t taste the bitterness at
all and it just the glowing is
phenomenal and that was just with two
tablets for this whole batch of candy it
working really well this is a very fun
project you can sculpt kind of whatever
shape you want and mold it and then make
your own shape of candy we’ve done
something similar with our thumb suckers
of course but I really just wanted to
try the glowing aspect of it I’m very
happy with how it turned out thanks for
joining us for this video and remember
to come gear yourself up with products
and merch at the king of random calm see
you there good see you’ve coated a
banach bio luminescent algae as a
distraction hey guys if you are on
twitter come follow me on twitter at the
king of random it’s a great place to
connect with me one on one that’s all
I’m gonna say about that because if you
want to you will and if you don’t you
won’t
Please follow and like us: